ETJava Beta | Java
 注册
登录
注册
登录
注册
登录
注册
登录
ElasticSearch简称ES 是一个第三方的基于Lucene的搜索服务器。它提供了一个分布式多用户能力的全文搜索引擎,基于RESTful web接口。
Elasticsearch是用Java开发的,并作为Apache许可条款下的开放源码发布,是当前流行的企业级搜索引擎。设计用于云计算中,能够达到实时搜索,稳定,可靠,快速,安装使用方便。

我们建立一个网站或应用程序,并要添加搜索功能,但是想要完成搜索工作的创建是非常困难的。我们希望搜索解决方案要运行速度快,我们希望能有一个零配置和一个完全免费的搜索模式,
我们希望能够简单地使用JSON通过HTTP来索引数据,我们希望我们的搜索服务器始终可用,我们希望能够从一台开始并扩展到数百台,我们要实时搜索,我们要简单的多租户,我们希望建立一个云的解决方案。
因此我们利用Elasticsearch来解决所有这些问题以及可能出现的更多其它问题。
下载ES安装包
帮助文档:
	https://www.elastic.co/guide/en/elasticsearch/reference/6.2/zip-targz.html
安装包下载:
	wget https://artifacts.elastic.co/downloads/elasticsearch/elasticsearch-6.2.4.zip
	wget https://artifacts.elastic.co/downloads/elasticsearch/elasticsearch-6.2.4.tar.gz

ES的环境要求:
    JDK8+
1. 关闭防火墙
    systemctl stop firewalld.service #停止firewall
    systemctl disable firewalld.service #禁止firewall开机启动
    firewall-cmd --state #查看默认防火墙状态(关闭后显示notrunning,开启后显示running)

2. 查看JDK版本 确保8.0或以上
    Java -version

3. 解压缩
	tar -zxvf elasticsearch-6.2.4.tar.gz
4. 创建新的用户
    ES为了安全考虑 禁止使用root用户启动,因此我们需要创建一个新的用户 并将对应的目录权限给到新用户即可
    1. 添加一个用户 elastic
       	useradd elastic
    2. 把目录权限赋予给elastic用户
    	chown -R elastic:elastic /home/es6/elasticsearch-6.2.4/
	3. 切换成elastic用户,然后执行启动
		su elastic
	4. 启动
		sh /home/es6/elasticsearch-6.2.4/bin/elasticsearch
		后台启动
			sh /home/es6/elasticsearch-6.2.4/bin/elasticsearch -d
5. 错误解决 出现 如下错误
    ERROR: [2] bootstrap checks failed
    [1]: max file descriptors [4096] for elasticsearch process is too low, increase to at least [65536]
    [2]: max virtual memory areas vm.max_map_count [65530] is too low, increase to at least [262144]
	[3]: max number of threads [3756] for user [elastic2] is too low, increase to at least [4096]
    解决:
    问题1  [1]: max file descriptors [4096] for elasticsearch process is too low, increase to at least [65536]
		该错误是因为每个进程同时打开文件数太小导致
        修改/etc/security/limits.conf文件,添加或修改如下行: (请切换到root用户 然后强制修改文件)
        *        hard    nofile           65536
        *        soft    nofile           65536

        注意:* 表示任意用户 此配置的意思是任意用户都可以打开的文件数量

    问题2  [2]: max virtual memory areas vm.max_map_count [65530] is too low, increase to at least [262144]
    	该错误是最大线程个数太小 有两种方式修改 临时修改 和 修改配置文件

        临时修改:$ sudo sysctl -w vm.max_map_count=2621441
    	或者修改 /etc/sysctl.conf 文件,添加 “vm.max_map_count”设置 永久改变(sudo sysctl -p /etc/sysctl.conf生效)。

    问题3  [3]: max number of threads [3756] for user [elastic2] is too low, increase to at least [4096]
           虚拟机分配的内存不足,增加内存配置即可

        修改/etc/security/limits.conf文件,文件末尾添加或修改如下行: (请切换到root用户 然后强制修改文件)
    	*        hard    nproc           4096
        *        soft    nproc           4096

    修改完成后执行/sbin/sysctl -p 执行下 让/etc/sysctl.conf 立即生效 设置后,可以使用
直接启动 sh /home/es6/elasticsearch-6.2.4/bin/elasticsearch
后台启动 sh /home/es6/elasticsearch-6.2.4/bin/elasticsearch -d
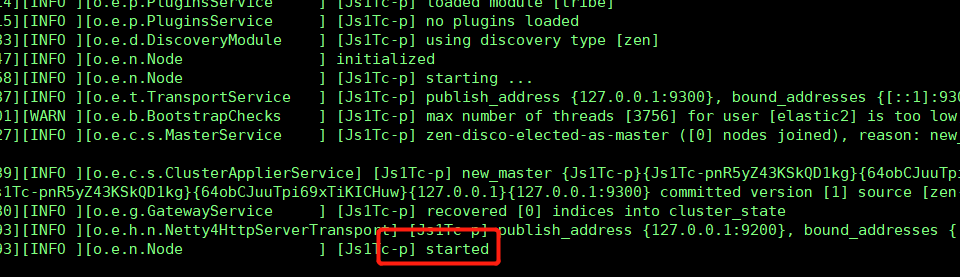
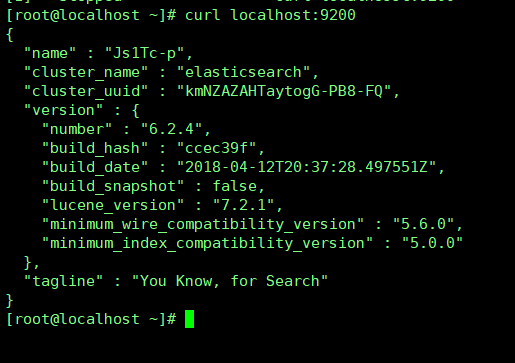
启动后在虚拟机内部测试是否启动成功 curl http://localhost:9200
出现下图信息 则表示启动成功
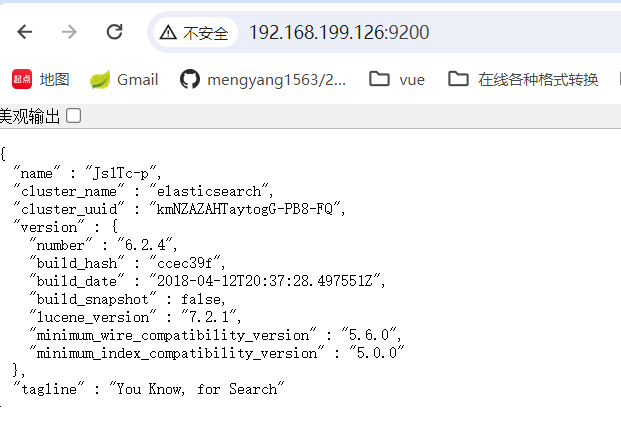
ES默认不允许外部访问,需要修改config/elasticsearch.yml 配置允许访问的连接
	Network节点下 进行配置


打开network.host和http.port两个注释掉的内容 并修改为虚拟机自身IP地址

# ---------------------------------- Network -----------------------------------
#
# By default Elasticsearch is only accessible on localhost. Set a different
# address here to expose this node on the network:
#
network.host: 192.168.119.126
#
# By default Elasticsearch listens for HTTP traffic on the first free port it
# finds starting at 9200. Set a specific HTTP port here:
#
http.port: 9200
#
# For more information, consult the network module documentation.
下载压缩包:https://artifacts.elastic.co/downloads/elasticsearch/elasticsearch-6.2.4.zip
下载后解压缩 然后修改config/elastic.yml

如果出现无法访问情况 需要修改安全策略

# Enable security features
xpack.security.enabled: false		(改为false)

xpack.security.enrollment.enabled: true

# Enable encryption for HTTP API client connections, such as Kibana, Logstash, and Agents
xpack.security.http.ssl:
  enabled: false		(改为false)
  keystore.path: certs/http.p12

# Enable encryption and mutual authentication between cluster nodes
xpack.security.transport.ssl:
  enabled: true
  verification_mode: certificate
  keystore.path: certs/transport.p12
  truststore.path: certs/transport.p12
# Create a new cluster with the current node only
# Additional nodes can still join the cluster later
cluster.initial_master_nodes: ["LAPTOP-U9QMRCLS"]

# Allow HTTP API connections from anywhere
# Connections are encrypted and require user authentication
http.host: 0.0.0.0

# Allow other nodes to join the cluster from anywhere
# Connections are encrypted and mutually authenticated
#transport.host: 0.0.0.0
 官方公众号
官方公众号
