ETJava Beta | Java
 注册
登录
注册
登录
注册
登录
注册
登录
说明
该文章是属于OverallAuth2.0系列文章,每周更新一篇该系列文章(从0到1完成系统开发)。
该系统文章,我会尽量说的非常详细,做到不管新手、老手都能看懂。
说明:OverallAuth2.0 是一个简单、易懂、功能强大的权限+可视化流程管理系统。
结合上一篇文章使用,味道更佳:.net core8 使用Swagger(附当前源码)
有兴趣的朋友,请关注我吧(*^▽^*)。
第一步:安装最新Jwt包
包名:Microsoft.AspNetCore.Authentication.JwtBearer
第二步:appsettings.json中配置jwt
 /*jwt鉴权*/
 "JwtSetting": {
   "Issuer": "微信公众号:不只是码农", //发行人
   "Audience": "微信公众号:不只是码农", //订阅人
   "ExpireSeconds": 120, //过期时间,默认分钟
   "ENAlgorithm": "HS256", //秘钥算法
   "SecurityKey": "bzsmn=Start20240913EndOverallAuth-WebApi" //秘钥构成
 }
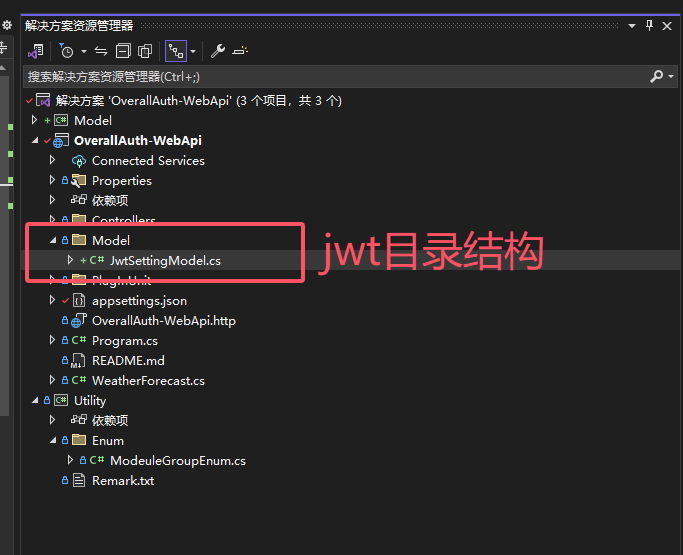
第三步:创建jwt解析模型
在OverallAuth-WebApi项目的目录下创建文件夹【model】,并创建一个类文件JwtSettingModel.cs
OverallAuth-WebApi结构,见上一篇文章:.net core8 使用Swagger(附当前源码)
 /// <summary>
 /// jwt配置模型
 /// </summary>
 public class JwtSettingModel
 {
     /// <summary>
     /// 密钥
     /// </summary>
     public string SecurityKey { get; set; }

     /// <summary>
     /// 加密算法
     /// </summary>
     public string ENAlgorithm { get; set; }

     /// <summary>
     /// 颁发者
     /// </summary>
     public string Issuer { get; set; }

     /// <summary>
     /// 接收者
     /// </summary>
     public string Audience { get; set; }

     /// <summary>
     /// 过期时间    单位:秒
     /// </summary>
     public int ExpireSeconds { get; set; }
 }
目录结构如下:
第四步:创建Jwt、AppSettings插件
目录结构如下:
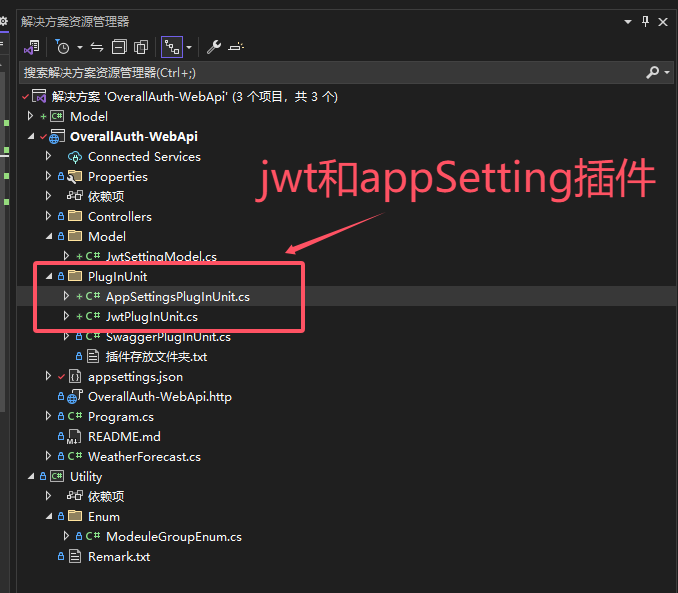
上图可以看到,我们创建了JwtPlugInUnit和AppSettingsPlugInUnit2个插件,它分别对应jwt和AppSettings配件文件的解析。
那么我们看下,这2个类里面的具体内容。
JwtPlugInUnit如下:
/// <summary>
/// jwt插件
/// </summary>
public static class JwtPlugInUnit
{
    /// <summary>
    /// 初始化JWT
    /// </summary>
    /// <param name="services"></param>
    public static void InitJWT(this IServiceCollection services)
    {
        var jwtsetting = AppSettingsPlugInUnit.GetNode<JwtSettingModel>("JwtSetting");
        services.AddAuthentication(JwtBearerDefaults.AuthenticationScheme)
            .AddJwtBearer(o =>
            {
                o.TokenValidationParameters = new TokenValidationParameters()
                {
                    ValidateIssuerSigningKey = true,
                    ValidIssuer = jwtsetting.Issuer,
                    ValidAudience = jwtsetting.Audience,
                    IssuerSigningKey = new SymmetricSecurityKey(Encoding.ASCII.GetBytes(jwtsetting.SecurityKey)),
                    ValidateIssuer = true,
                    ValidateAudience = true,
                    ValidateLifetime = true,
                    ClockSkew = TimeSpan.Zero
                };
            });
    }
}
AppSettingsPlugInUnit如下:
 /// <summary>
 /// AppSettings配置文件插件
 /// </summary>
 public class AppSettingsPlugInUnit
 {
     /// <summary>
     /// 声明配置属性
     /// </summary>
     public static IConfiguration Configuration { get; set; }

     /// <summary>
     /// 构造函数
     /// </summary>
     static AppSettingsPlugInUnit()
     {
         Configuration = new ConfigurationBuilder()
              .Add(new JsonConfigurationSource { Path = "appsettings.json", ReloadOnChange = true })
              .Build();
     }

     /// <summary>
     /// 获得配置文件的对象值
     /// </summary>
     /// <param name="jsonPath">文件路径</param>
     /// <param name="key"></param>
     /// <returns></returns>
     public static string GetJson(string jsonPath, string key)
     {
         if (string.IsNullOrEmpty(jsonPath) || string.IsNullOrEmpty(key)) return null;
         IConfiguration config = new ConfigurationBuilder().AddJsonFile(jsonPath).Build();//json文件地址
         return config.GetSection(key).Value;//json某个对象
     }

     /// <summary>
     /// 获取数据库连接字符串
     /// </summary>
     /// <returns></returns>
     public static string GetMysqlConnection()
     {
         return Configuration.GetConnectionString("MySql").Trim();
     }

     /// <summary>
     /// 根据节点名称获取配置模型
     /// </summary>
     /// <typeparam name="T"></typeparam>
     /// <param name="Node"></param>
     /// <returns></returns>
     public static T GetNode<T>(string Node) where T : new()
     {
         T model = Configuration.GetSection(Node).Get<T>();
         return model;

     }
 }
第五步:让jwt遵守Swagger协议
因为我们系统使用到了Swagger,所以要让jwt遵守Swagger协议,因此我们要在Swagger中添加如下代码。
/// <summary>
/// 初始化Swagger
/// </summary>
/// <param name="services"></param>
public static void InitSwagger(this IServiceCollection services)
{
    //添加swagger
    services.AddSwaggerGen(optinos =>
    {
        typeof(ModeuleGroupEnum).GetEnumNames().ToList().ForEach(version =>
        {
            optinos.SwaggerDoc(version, new OpenApiInfo()
            {
                Title = "权限管理系统",
                Version = "V2.0",
                Description = "求关注,求一键三连",
                Contact = new OpenApiContact { Name = "微信公众号作者:不只是码农   b站作者:我不是码农呢", Url = new Uri("http://www.baidu.com") }
            });

        });

        //反射获取接口及方法描述
        var xmlFileName = $"{Assembly.GetExecutingAssembly().GetName().Name}.xml";
        optinos.IncludeXmlComments(Path.Combine(AppContext.BaseDirectory, xmlFileName), true);

        //使用jwt
        optinos.AddSecurityDefinition("Bearer", new OpenApiSecurityScheme
        {
            Description = "请在下方输入框子输入Bearer Token 开启JWT鉴权",
            Name = "Authorization", // 默认名称,不能修改
            In = ParameterLocation.Header,
            Type = SecuritySchemeType.ApiKey,
            Scheme = "Bearer"
        });

        //让swagger遵守jwt协议
        optinos.AddSecurityRequirement(new OpenApiSecurityRequirement
         {
           {
             new OpenApiSecurityScheme
             {
                Reference = new OpenApiReference
                {
                     Type = ReferenceType.SecurityScheme,
                    Id = "Bearer"
                }
             },
            new List<string>()
            }
         });

    });
}
说明:InitSwagger方法是初始化Swagger的方法,在上一篇文章:.net core8 使用Swagger(附当前源码) 中有讲到。
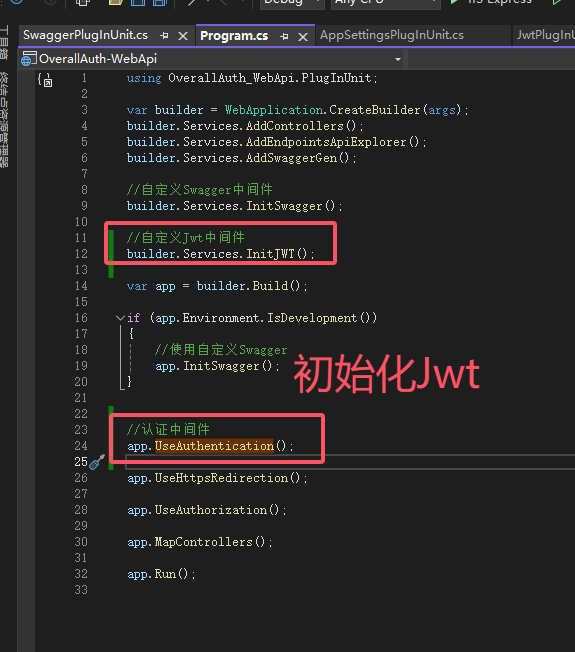
第六步:初始化Jwt
在Program中添加一下代码,初始化Jwt
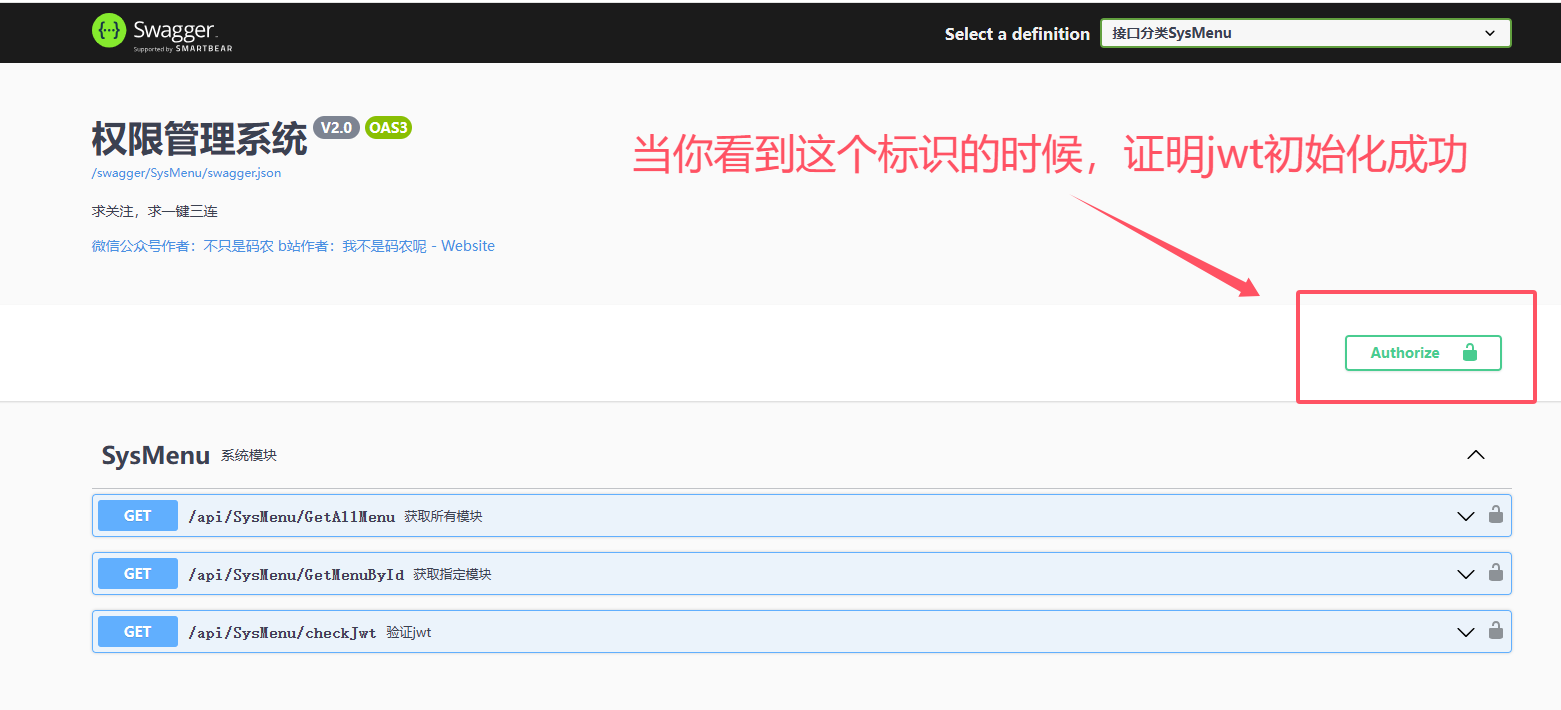
第七步:验证Jwt
做好以上步骤,jwt就可以正常使用。
当你看到图中标识时,就表示jwt初始化成功,就可以在系统中使用jwt鉴权等操作。
使用【[Authorize]】、【 [AllowAnonymous]】特性测试鉴权。
以下2个接口一个需要验证、一个不需要验证,我们来测试下。
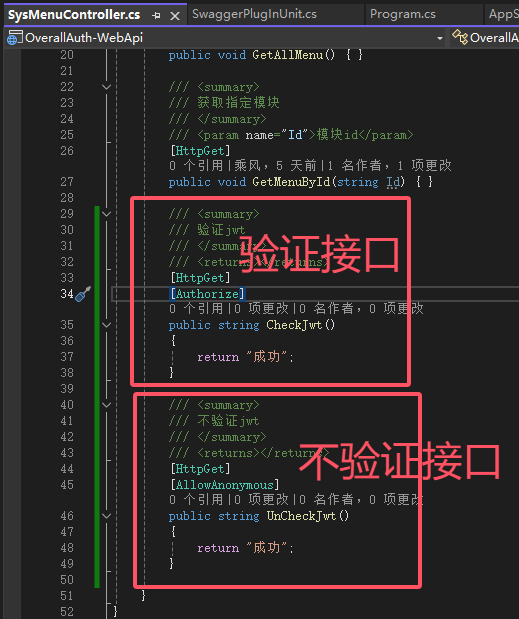
[Authorize]开启验证测试
CheckJwt接口:开启验证,不传token

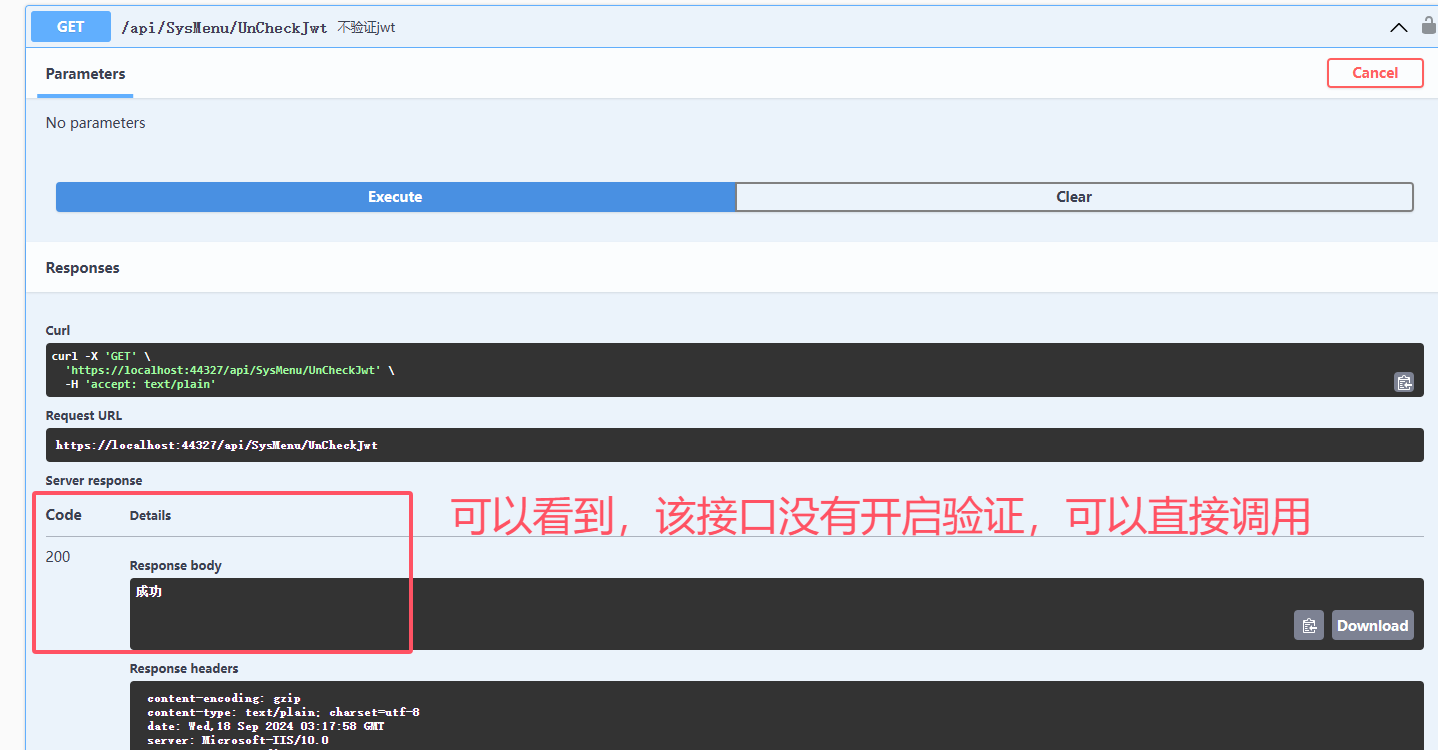
可以看到,开启jwt验证的,接口在没有传入token的情况下,访问失败。
UnCheckJwt接口:不开启验证。
以上就是.net core8 使用jwt系统鉴权的配置过程。
感谢你的耐心观看。
如果对你有帮助,请关注我微信公众号吧(*^▽^*)。
源代码地址:https://gitee.com/yangguangchenjie/overall-auth2.0-web-api
帮我Star,谢谢。
有兴趣的朋友,请关注我微信公众号吧(*^▽^*)。

关注我:一个全栈多端的宝藏博主,定时分享技术文章,不定时分享开源项目。关注我,带你认识不一样的程序世界
 官方公众号
官方公众号