ETJava Beta | Java
 注册
登录
注册
登录
注册
登录
注册
登录

前几天,又一款非自回归的文字转语音的AI模型:MaskGCT,开放了源码,和同样非自回归的F5-TTS模型一样,MaskGCT模型也是基于10万小时数据集Emilia训练而来的,精通中英日韩法德6种语言的跨语种合成。数据集Emilia是全球最大且最为多样的高质量多语种语音数据集之一。
本次分享一下如何在本地部署MaskGCT项目,让您的显卡再次发烧。
首先确保本地已经安装好Python3.11环境,安装包可以去Python的官方下载:
python.org
随后克隆官方项目:
git clone https://github.com/open-mmlab/Amphion.git
官方提供了基于linux的安装shell脚本:
pip install setuptools ruamel.yaml tqdm
pip install tensorboard tensorboardX torch==2.0.1
pip install transformers===4.41.1
pip install -U encodec
pip install black==24.1.1
pip install oss2
sudo apt-get install espeak-ng
pip install phonemizer
pip install g2p_en
pip install accelerate==0.31.0
pip install funasr zhconv zhon modelscope
# pip install git+https://github.com/lhotse-speech/lhotse
pip install timm
pip install jieba cn2an
pip install unidecode
pip install -U cos-python-sdk-v5
pip install pypinyin
pip install jiwer
pip install omegaconf
pip install pyworld
pip install py3langid==0.2.2 LangSegment
pip install onnxruntime
pip install pyopenjtalk
pip install pykakasi
pip install -U openai-whisper
这里笔者为大家转换为适合Windows的requirements.txt依赖文件:
setuptools
ruamel.yaml
tqdm
transformers===4.41.1
encodec
black==24.1.1
oss2
phonemizer
g2p_en
accelerate==0.31.0
funasr
zhconv
zhon
modelscope
timm
jieba
cn2an
unidecode
cos-python-sdk-v5
pypinyin
jiwer
omegaconf
pyworld
py3langid==0.2.2
LangSegment
onnxruntime
pyopenjtalk
pykakasi
openai-whisper
json5
运行命令:
pip3 install -r requirements.txt
安装依赖即可。
安装onnxruntime-gpu:
pip3 install onnxruntime-gpu
安装torch三件套:
pip3 install torch torchvision torchaudio --index-url https://download.pytorch.org/whl/cu118
由于MaskGCT项目后端依赖espeak软件,所以需要在本地进行配置,eSpeak 是一个紧凑的开源文本转语音 (TTS) 合成器,支持多种语言和口音 。它使用“共振峰合成”方法,允许以较小的体积提供多种语言 。语音清晰,可以高速使用,但不如基于人类语音录音的较大合成器自然流畅,而MaskGCT就是在espeak的合成基础上进行二次推理。
首先运行命令安装espeak:
winget install espeak
如果装不上,也可以下载安装包手动安装:
https://sourceforge.net/projects/espeak/files/espeak/espeak-1.48/setup_espeak-1.48.04.exe/download
随后下载espeak-ng安装包:
https://github.com/espeak-ng/espeak-ng/releases
下载后双击安装。
接着把 C:\Program Files\eSpeak NG\libespeak-ng.dll 拷贝到 C:\Program Files (x86)\eSpeak\command_line 目录。
然后把 libespeak-ng.dll 重命名为 espeak-ng.dll
最后把 C:\Program Files (x86)\eSpeak\command_line 目录配置到环境变量即可。
都配置好之后,编写推理脚本 local_test.py:
from models.tts.maskgct.maskgct_utils import *
from huggingface_hub import hf_hub_download
import safetensors
import soundfile as sf
import os
import argparse
os.environ['HF_HOME'] = os.path.join(os.path.dirname(__file__), 'hf_download')

print(os.path.join(os.path.dirname(__file__), 'hf_download'))

parser = argparse.ArgumentParser(description="GPT-SoVITS api")
parser.add_argument("-p", "--prompt_text", type=str, default="说得好像您带我以来我考好过几次一样")
parser.add_argument("-a", "--audio", type=str, default="./说得好像您带我以来我考好过几次一样.wav")
parser.add_argument("-t", "--text", type=str, default="你好")
parser.add_argument("-l", "--language", type=str, default="zh")
parser.add_argument("-lt", "--target_language", type=str, default="zh")
args = parser.parse_args()

if __name__ == "__main__":

    # download semantic codec ckpt
    semantic_code_ckpt = hf_hub_download("amphion/MaskGCT", filename="semantic_codec/model.safetensors")

    # download acoustic codec ckpt
    codec_encoder_ckpt = hf_hub_download("amphion/MaskGCT", filename="acoustic_codec/model.safetensors")
    codec_decoder_ckpt = hf_hub_download("amphion/MaskGCT", filename="acoustic_codec/model_1.safetensors")

    # download t2s model ckpt
    t2s_model_ckpt = hf_hub_download("amphion/MaskGCT", filename="t2s_model/model.safetensors")

    # download s2a model ckpt
    s2a_1layer_ckpt = hf_hub_download("amphion/MaskGCT", filename="s2a_model/s2a_model_1layer/model.safetensors")
    s2a_full_ckpt = hf_hub_download("amphion/MaskGCT", filename="s2a_model/s2a_model_full/model.safetensors")

    # build model
    device = torch.device("cuda")
    cfg_path = "./models/tts/maskgct/config/maskgct.json"
    cfg = load_config(cfg_path)
    # 1. build semantic model (w2v-bert-2.0)
    semantic_model, semantic_mean, semantic_std = build_semantic_model(device)
    # 2. build semantic codec
    semantic_codec = build_semantic_codec(cfg.model.semantic_codec, device)
    # 3. build acoustic codec
    codec_encoder, codec_decoder = build_acoustic_codec(cfg.model.acoustic_codec, device)
    # 4. build t2s model
    t2s_model = build_t2s_model(cfg.model.t2s_model, device)
    # 5. build s2a model
    s2a_model_1layer = build_s2a_model(cfg.model.s2a_model.s2a_1layer, device)
    s2a_model_full =  build_s2a_model(cfg.model.s2a_model.s2a_full, device)


    # load semantic codec
    safetensors.torch.load_model(semantic_codec, semantic_code_ckpt)
    # load acoustic codec
    safetensors.torch.load_model(codec_encoder, codec_encoder_ckpt)
    safetensors.torch.load_model(codec_decoder, codec_decoder_ckpt)
    # load t2s model
    safetensors.torch.load_model(t2s_model, t2s_model_ckpt)
    # load s2a model
    safetensors.torch.load_model(s2a_model_1layer, s2a_1layer_ckpt)
    safetensors.torch.load_model(s2a_model_full, s2a_full_ckpt)

    # inference
    prompt_wav_path = args.audio
    save_path = "output.wav"
    prompt_text = args.prompt_text
    target_text = args.text
    # Specify the target duration (in seconds). If target_len = None, we use a simple rule to predict the target duration.
    target_len = None

    maskgct_inference_pipeline = MaskGCT_Inference_Pipeline(
        semantic_model,
        semantic_codec,
        codec_encoder,
        codec_decoder,
        t2s_model,
        s2a_model_1layer,
        s2a_model_full,
        semantic_mean,
        semantic_std,
        device,
    )

    recovered_audio = maskgct_inference_pipeline.maskgct_inference(
        prompt_wav_path, prompt_text, target_text,args.language,args.target_language, target_len=target_len
    )
    sf.write(save_path, recovered_audio, 24000)
首次推理会在hf_download目录下载10个G的模型。
推理过程中,会占用11G的显存:
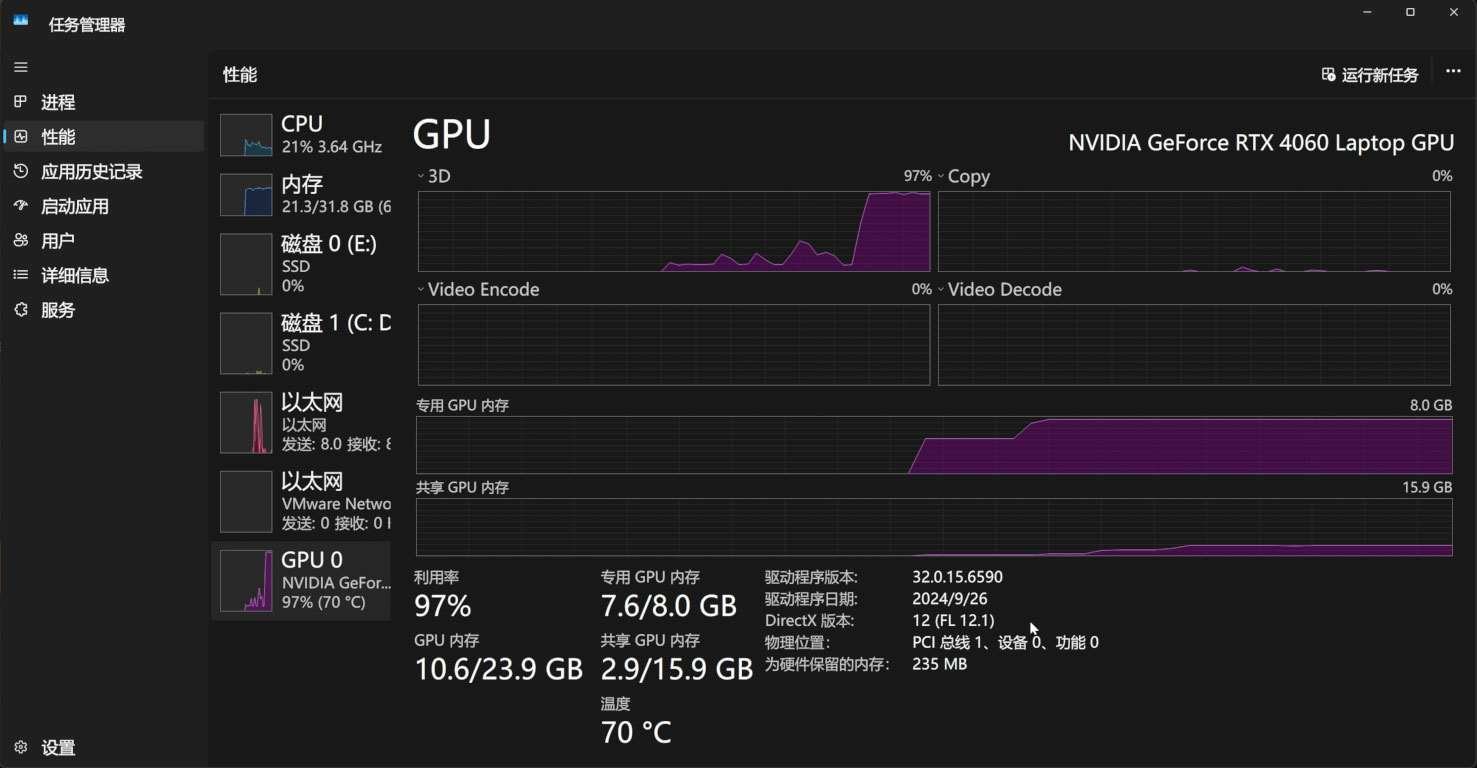
如果您的显存低于11G,那么务必打开Nvidia控制面板的系统内存回退策略,通过系统内存来补足显存:

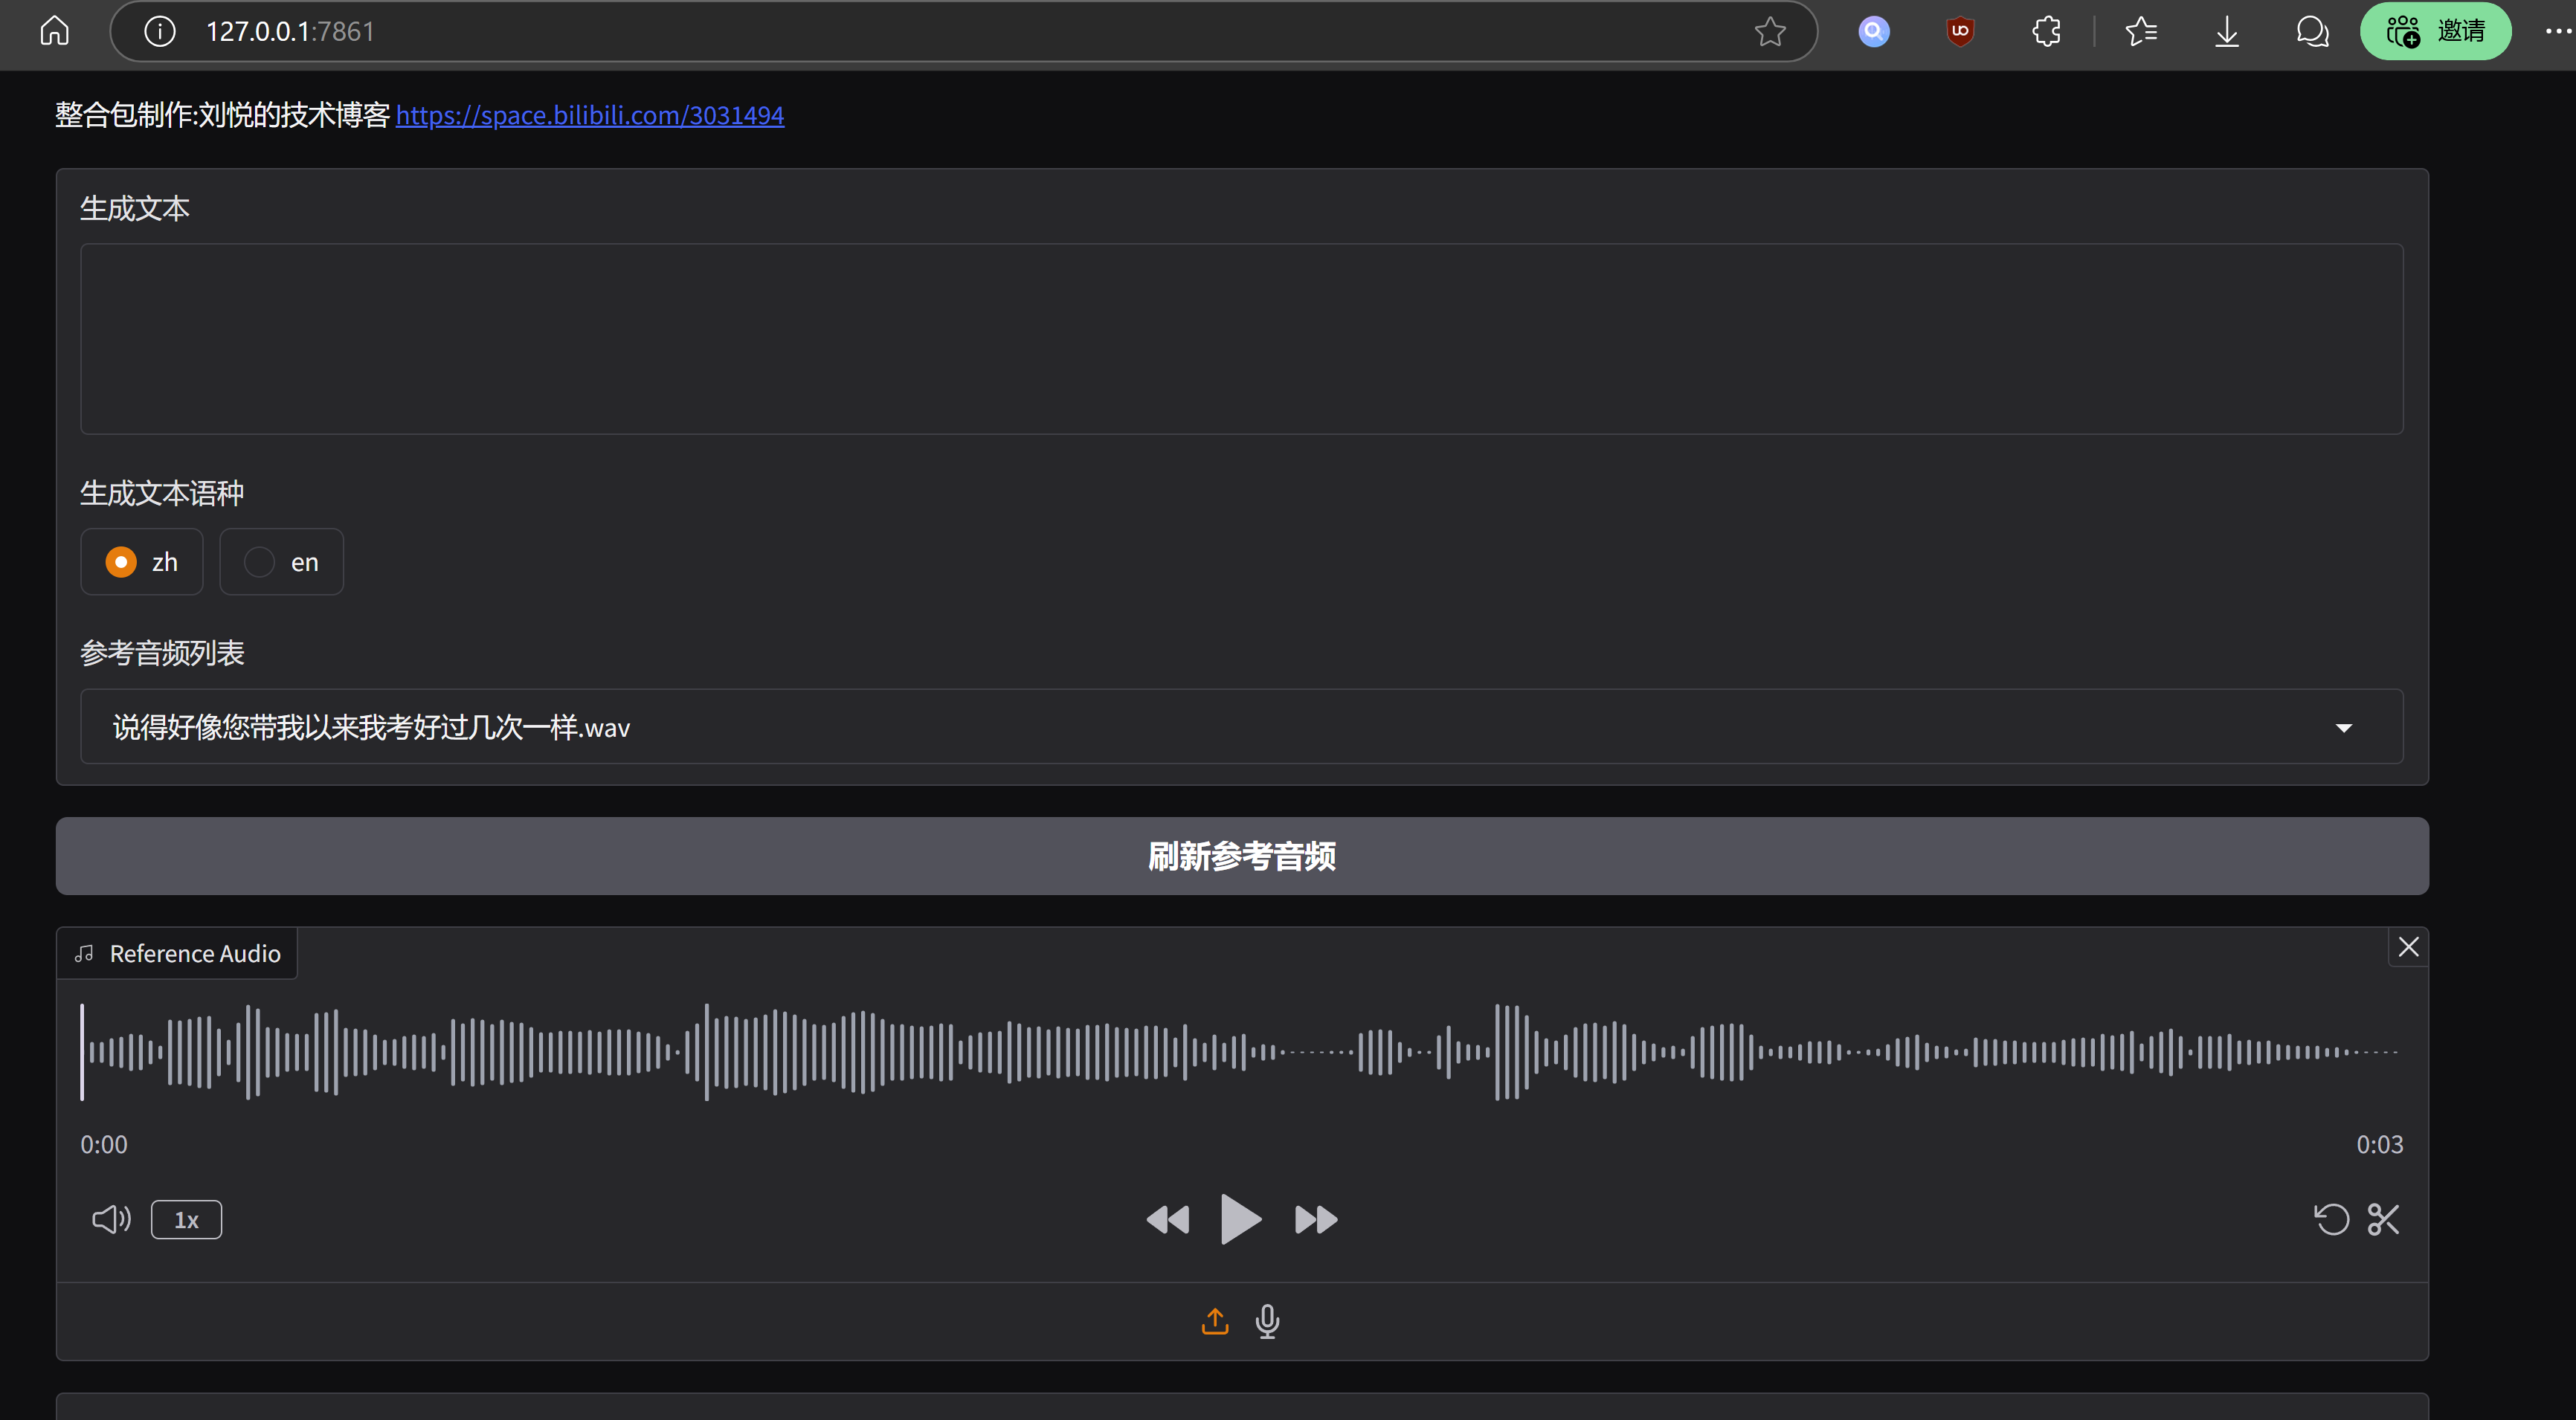
如果愿意,也可以基于gradio写一个简单的webui界面,app.py:
import os
import gc
import re
import gradio as gr
import numpy as np
import subprocess
os.environ['HF_HOME'] = os.path.join(os.path.dirname(__file__), 'hf_download')
# 设置HF_ENDPOINT环境变量
os.environ["HF_ENDPOINT"] = "https://hf-mirror.com"


reference_wavs = ["请选择参考音频或者自己上传"]
for name in os.listdir("./参考音频/"):
    reference_wavs.append(name)

def change_choices():

    reference_wavs = ["请选择参考音频或者自己上传"]

    for name in os.listdir("./参考音频/"):
        reference_wavs.append(name)

    return {"choices":reference_wavs, "__type__": "update"}


def change_wav(audio_path):

    text = audio_path.replace(".wav","").replace(".mp3","").replace(".WAV","")

    # text = replace_speaker(text)

    return f"./参考音频/{audio_path}",text


def do_cloth(gen_text_input,ref_audio_input,model_choice_text,model_choice_re,ref_text_input):

    cmd = fr'.\py311_cu118\python.exe local_test.py -t "{gen_text_input}" -p "{ref_text_input}" -a "{ref_audio_input}" -l {model_choice_re} -lt {model_choice_text} '

    print(cmd)
    res = subprocess.Popen(cmd)
    res.wait()

    return "output.wav"


with gr.Blocks() as app_demo:
    gr.Markdown(
        """
项目地址:https://github.com/open-mmlab/Amphion/tree/main/models/tts/maskgct

整合包制作:刘悦的技术博客 https://space.bilibili.com/3031494
"""
    )
    gen_text_input = gr.Textbox(label="生成文本", lines=4)
    model_choice_text = gr.Radio(
        choices=["zh", "en"], label="生成文本语种", value="zh",interactive=True)
    wavs_dropdown = gr.Dropdown(label="参考音频列表",choices=reference_wavs,value="选择参考音频或者自己上传",interactive=True)
    refresh_button = gr.Button("刷新参考音频")
    refresh_button.click(fn=change_choices, inputs=[], outputs=[wavs_dropdown])
    ref_audio_input = gr.Audio(label="Reference Audio", type="filepath")
    ref_text_input = gr.Textbox(
        label="Reference Text",
        info="Leave blank to automatically transcribe the reference audio. If you enter text it will override automatic transcription.",
        lines=2,
    )
    model_choice_re = gr.Radio(
        choices=["zh", "en"], label="参考音频语种", value="zh",interactive=True
    )
    wavs_dropdown.change(change_wav,[wavs_dropdown],[ref_audio_input,ref_text_input])
    generate_btn = gr.Button("Synthesize", variant="primary")


    audio_output = gr.Audio(label="Synthesized Audio")

    generate_btn.click(do_cloth,[gen_text_input,ref_audio_input,model_choice_text,model_choice_re,ref_text_input],[audio_output])

def main():
    global app_demo
    print(f"Starting app...")
    app_demo.launch(inbrowser=True)


if __name__ == "__main__":
    main()
当然,别忘了安装gradio依赖:
pip3 install -U gradio
运行效果是这样的:
MaskGCT模型的优势在于语气韵律层面十分突出,可以媲美真实语音,缺点也很明显,运行成本偏高,工程化层面优化不足。MaskGCT项目主页中已经有其商业版本模型的入口,据此推断,官方应该不会在开源版本中太过发力,最后奉上一键整合包,与众乡亲同飨:
MaskGCT一键包整合包 https://pan.quark.cn/s/e74726b84c78
 官方公众号
官方公众号