ETJava Beta | Java
 注册
登录
注册
登录
注册
登录
注册
登录
本文主要讲神经网络的上半部分。
这篇文章开始有很多公式了,这些公式都很简单,但是如果是不经常在脑海里思考公式的人,那可能需要多花点时间做一下自我训练,个人感觉,也就几天时间,就能把自己感觉给调整出来。
习惯了公式看下面内容就会轻松很多,另外如果要深入学习人工智能,熟练的认知公式也是个必须的事情。
另外,我发现我前面文章写的有歧义的地方还是挺多,虽然,已经改了一部分,但,可能还有没发现的,大家看的时候尽量多理解着看吧。
本着目的是学会使用神经网络的开发,至于数学的部分,就能过就过吧。
先结合以前的知识理解一个例子,理解了这个例子,后面理解神经网络就容易多了。
class NeuralNet1(nn.Module):
def __init__(self, input_size, hidden_size):
super(NeuralNet1,self).__init__()
self,linear1 = nn.Linear(input_size, hidden_size) # x的列 转成 隐藏层的列
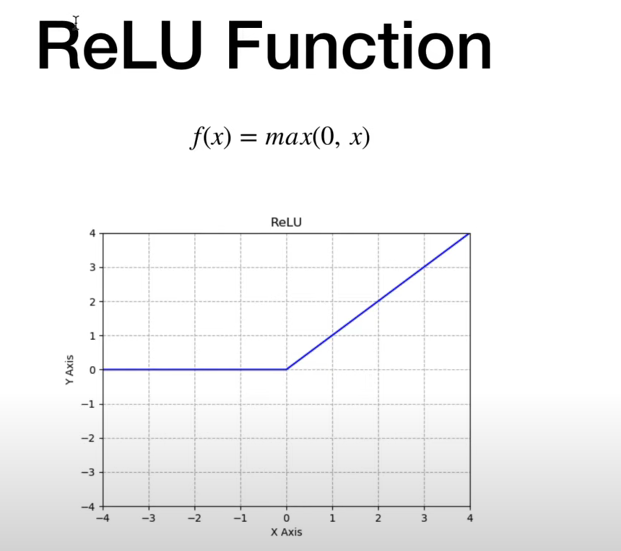
self.relu = nn.ReLU() #使用了ReLU(Rectified Linear Unit) 作为激活函数
self.linear2 = nn.Linear(hidden_size,1) #隐藏层的列转成1列
def forward(self, x):
out = self.linear1(x)
out = self.relu(out)
out = self.linear2(out)# sigmoid at the end
y_pred = torch.sigmoid(out)
return y_pred
model=NeuralNet1(input_size=28*28,hidden_size=5)
criterion =nn.BCELoss()
结合我们之前的知识,上面代码就是定义了一个类,该类继承了Module。
然后初始化函数接受了两参数,俩参数分别是x列,和隐藏层列,然后定义三个对象linear1,linear2,relu。
然后forward就是执行,中间的转换逻辑是x列转成hidden列,hidden列转1列,这中间再加一个激活函数,我们先不管激活函数是什么,反正,代码结构,大概就是这样的逻辑。
criterion =nn.BCELosS()是定义损失函数,BCELoss 的全称是 Binary Cross Entropy Loss(二元交叉熵损失)。
ps:大家有没有注意到,自从我们开始使用model后,就再也没使用 requires_grad来开启张量计算了,这是因为model在计算的时候自己就开了【torch.tensor(0.0, requires_grad=True)】
激活函数其实也是函数,就是把x进行一下数据转换。
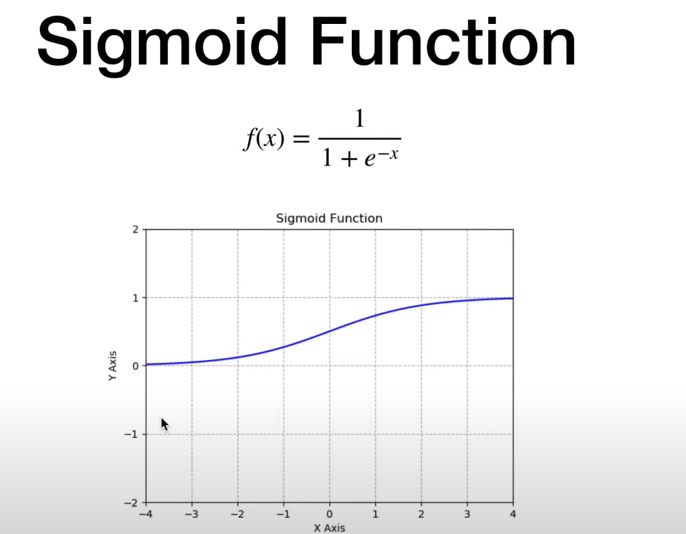
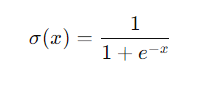
我们上篇文章已经使用过了Sigmoid把数据转换成百分比了。
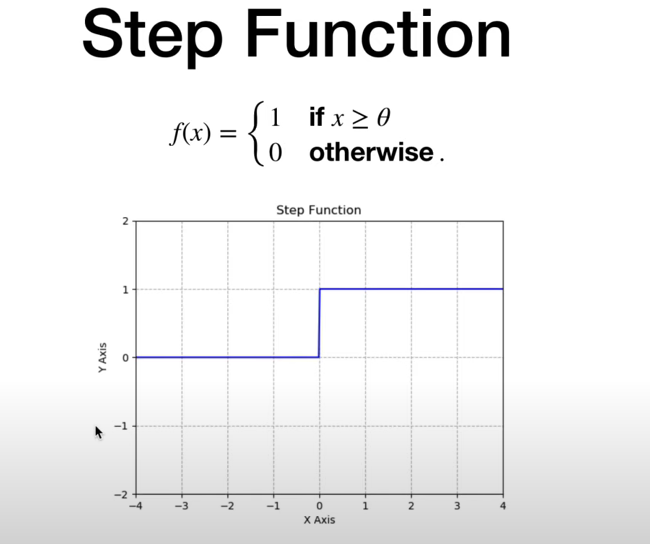
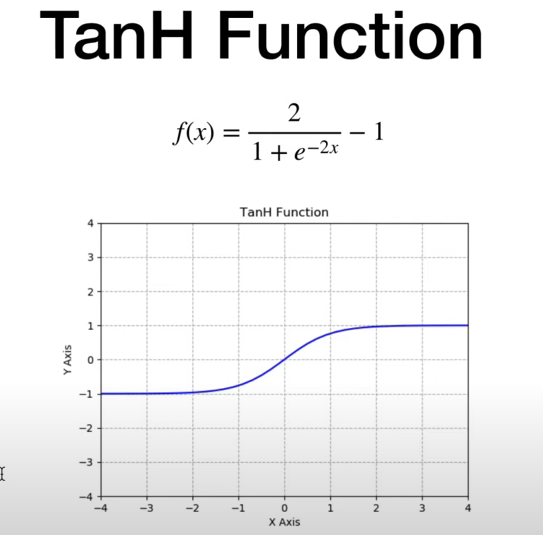
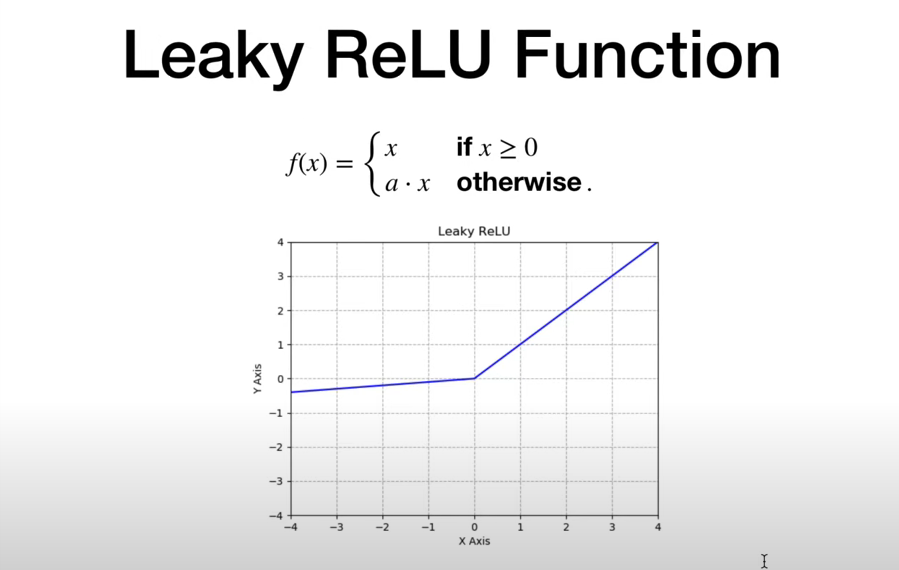
下面看一下最受欢迎的激活函数都有什么,如下:
# Most popular activationfunctions
# 1. Step function
# 2. Sigmoid
# 3. TanH
# 4. ReLU (不知道用什么,就用这个)
# 5. Leaky ReLU6. Softmax
各个激活函数x转换成y的模式
激活函数使用参考下面代码
import torch
import torch.nn as nn
import numpy as np
import torch.nn.functional as F #nn不好使时,在这里找激活函数
# 方法1 (create nn modules)
class NeuralNet(nn.Module):
    def __init__(self, input_size, hidden_size):
        super(NeuralNet, self)._init ()
        self.linear1 =nn.Linear(input_size,hidden_size)
        self.relu = nn.ReLU()
        self.linear2 =nn.inear(hidden_size,1)
        self.sigmoid = nn.Sigmoid()
    def forward(self, x):
        out = self.linear1(x)
        out = self.relu(out)
        out = self.linear2(out)
        out = self.sigmoid(out)
        return out

# 方法2 (use activation functions directly in forward pass)
class NeuralNet(nn.Module):
    def __init__(self, input_size, hidden_size):
        super(NeuralNet,self).__init__()
        self.linear1 =nn.Linear(input_size,hidden_size)
        self.linear2 =nn.Linear(hidden_size,1)
    def forward(self,x):
        # F.leaky_relu() #leaky_relu使用方法

        out = torch.relu(self.linear1(x))
        out = torch.sigmoid(self.linear2(out))
        return out
我们先对下面函数进行一下逻辑理解。
前面我们使用了MSELoss做损失函数,他的逻辑是求y预测和y差的平方的均值,如下图:

后面我们的例子里,就把MSELoss换成了BCELoss,当时我们就是把他当做一个求损失值的函数,没研究他的逻辑。
BCELoss的全称是 Binary Cross Entropy Loss(二元交叉熵损失)他的公式是这样的。

经过这个转换y_pred的值范围已经是(0, 1)了。
后来在写例子的时候,在前向传播的时候,又增加了torch.sigmoid做数据转换。
sigmoid的公式是这样的。
cross_entropy是 交叉熵损失函数,他的公式是这样的。

结合代码理解。
loss = nn.CrossEntropyLoss()
Y= torch.tensor([0]) #这y是一行一列矩阵,但值0表示类别,如0=猫,1=狗,2=兔子
#nsamples x nclasses=1x3  1行3列
Y_pred_good = torch.tensor([[2.0,1.0, 0.1]]) # 这个预测的y里,2最大,2的索引是0.所以,这个预测的y最可能是猫
Y_pred_bad = torch.tensor([[0.5,2.0,0.3]])  # 这个预测的y里,2最大,2的索引是1.所以,这个预测的y最可能是狗
11 = loss(Y_pred_good, Y)
12 = loss(Y_pred_bad, Y)
print(l1.item())
print(l2.item())

_,predictions1 = torch.max(Y_pred_good, 1)
_,predictions2 = torch.max(Y_pred_bad, 1)
print(predictions1)
print(predictions2)
多个类别的预测如下:
loss = nn.CrossEntropyLoss()
Y= torch.tensor([2,0,1]) #这y是一行三列矩阵,但值表示的含义是类别,如2,0,1=猫,0,1,2=狗,2,1,0=兔子
#nsamples x nclasses=3x3  3行3列
Y_pred_good = torch.tensor([[2.0,1.0, 2.1],[2.0,1.0, 0.1],[2.0,3.0, 0.1]]) # 这个预测的y里,三个张量的最大值的索引分别是 2,0,1 ,他跟上面的猫的类别一致,所以是猫这个类别,因为Y的值就代表猫,所以这个是一个好的预测
Y_pred_bad = torch.tensor([[0.5,2.0,0.3],[0.5,2.0,0.3],[0.5,2.0,0.3]])  # 这个预测跟Y不匹配,所以是个不好的预测
11 = loss(Y_pred_good, Y)
12 = loss(Y_pred_bad, Y)
print(l1.item())
print(l2.item())

_,predictions1 = torch.max(Y_pred_good, 1) #values, indices = torch.max(input, dim)
_,predictions2 = torch.max(Y_pred_bad, 1)
print(predictions1)
print(predictions2)
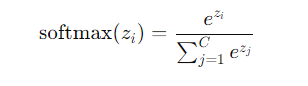
Softmax 激活函数
假设你有一个模型输出的向量 [2.0, 1.0, 0.1],应用 Softmax 函数可以将其转换为 [0.7, 0.2, 0.1],表示各个类别的概率分布。
公式如下:
结合代码理解:
# 之前把预测的y都转成了0~1之间的概率值,现在可以用softmax处理
# softmax
def softmax(x):
    return np.exp(x)/np.sum(np.exp(x), axis=0)


x = np.array([2.0, 1.0, 0.1])
outputs = softmax(x)
print('softmax numpy:', outputs)
torch的softmax使用。
x= torch.tensor([2.0,1.0,0.1])
outputs = torch.softmax(x, dim=0)
print(outputs)
CrossEntropyLoss内部会先申请Softmax函数的执行,在调用自己的计算逻辑(就是对数计算那一套)。
这段代码是Dataset和DataLoader的逻辑,简单理解一下即可。
# https://gist.github.com/tijptjik/9408623 下获取wine.csv
import torch
import torchvision
from torch.utils.data import Dataset, DataLoader
import numpy as np
import math
import os


class WineDataset(Dataset):
    def __init__(self, transform=None):
        # data loading
        # 获取脚本所在的目录
        script_dir = os.path.dirname(__file__)
        # 构建文件的完整路径
        file_path = os.path.join(script_dir, 'wine.csv')
        xy = np.loadtxt(file_path, delimiter=",", dtype=np.float32, skiprows=1)
        self.x = xy[:, 1:]
        self.y = xy[:, [0]]  # nsamples, 1
        self.n_samples = xy.shape[0]

        self.transform = transform

    def __getitem__(self, index):
        sample = self.x[index], self.y[index]
        if (self.transform):
            sample = self.transform(sample)
        return sample

    def __len__(self):
        return self.n_samples


class ToTensor:
    def __call__(self, sample):
        inputs, targets = sample
        return torch.from_numpy(inputs), torch.from_numpy(targets)


dataset = WineDataset(transform=ToTensor())
first_data = dataset[0]
feautres, labels = first_data
print(feautres)
print(type(feautres), type(labels))
传送门:
零基础学习人工智能—Python—Pytorch学习(一)
零基础学习人工智能—Python—Pytorch学习(二)
零基础学习人工智能—Python—Pytorch学习(三)
零基础学习人工智能—Python—Pytorch学习(四)
零基础学习人工智能—Python—Pytorch学习(五)
零基础学习人工智能—Python—Pytorch学习(六)
注:此文章为原创,任何形式的转载都请联系作者获得授权并注明出处!

若您觉得这篇文章还不错,请点击下方的【推荐】,非常感谢!
 官方公众号
官方公众号