ETJava Beta | Java
 注册
登录
注册
登录
注册
登录
注册
登录
ggml 是一个用 C 和 C++ 编写、专注于 Transformer 架构模型推理的机器学习库。该项目完全开源,处于活跃的开发阶段,开发社区也在不断壮大。ggml 和 PyTorch、TensorFlow 等机器学习库比较相似,但由于目前处于开发的早期阶段,一些底层设计仍在不断改进中。
相比于 llama.cpp 和 whisper.cpp 等项目,ggml 也在一直不断广泛普及。为了实现端侧大语言模型推理,包括 ollama、jan、LM Studio 等很多项目内部都使用了 ggml。
相比于其它库,ggml 有以下优势:
当然,目前 ggml 还存在一些缺点。如果你选择 ggml 进行开发,这些方面你需要了解 (后续可能会改进):
本文将带你入门 ggml 开发。文中不会涉及诸如使用 llama.cpp 进行 LLM 推理等的高级项目。相反,我们将着重介绍 ggml 的核心概念和基本用法,为想要使用 ggml 的开发者们后续学习高级开发打好基础。
我们先从编译开始。简单起见,我们以在 Ubuntu 上编译 ggml 作为示例。当然 ggml 支持在各类平台上编译 (包括 Windows、macOS、BSD 等)。指令如下:
# Start by installing build dependencies
# "gdb" is optional, but is recommended
sudo apt install build-essential cmake git gdb

# Then, clone the repository
git clone https://github.com/ggerganov/ggml.git
cd ggml

# Try compiling one of the examples
cmake -B build
cmake --build build --config Release --target simple-ctx

# Run the example
./build/bin/simple-ctx
期望输出:
mul mat (4 x 3) (transposed result):
[ 60.00 55.00 50.00 110.00
 90.00 54.00 54.00 126.00
 42.00 29.00 28.00 64.00 ]
看到期望输出没问题,我们就继续。
首先我们学习一些 ggml 的核心概念。如果你熟悉 PyTorch 或 TensorFlow,这可能对你来说有比较大的跨度。但由于 ggml 是一个 低层 的库,理解这些概念能让你更大幅度地掌控性能。
ggml_backend 的一个“内存分配器”。比如你要在 GPU 上执行计算,那你就需要通过一个buffer_type (通常缩写为 buft ) 去在 GPU 上分配内存。buffer_type 分配的缓存。需要注意的是,一个缓存可以存储多个张量数据。这里的简单示例将复现第一节最后一行指令代码中的示例程序。我们首先创建两个矩阵,然后相乘得到结果。如果使用 PyTorch,代码可能长这样:
import torch

# Create two matrices
matrix1 = torch.tensor([
  [2, 8],
  [5, 1],
  [4, 2],
  [8, 6],
])
matrix2 = torch.tensor([
  [10, 5],
  [9, 9],
  [5, 4],
])

# Perform matrix multiplication
result = torch.matmul(matrix1, matrix2.T)
print(result.T)
使用 ggml,则需要根据以下步骤来:
ggml_context 来存储张量数据ggml_cgraph请注意: 本示例中,我们直接在 ggml_context 里分配了张量的具体数据。但实际上,内存应该被分配成一个设备端的缓存,我们将在下一部分介绍。
我们先创建一个新文件夹 examples/demo ,然后执行以下命令创建 C 文件和 CMake 文件。
cd ggml # make sure you're in the project root

# create C source and CMakeLists file
touch examples/demo/demo.c
touch examples/demo/CMakeLists.txt
本示例的代码是基于 simple-ctx.cpp 的。
编辑 examples/demo/demo.c ,写入以下代码:
#include "ggml.h"
#include <string.h>
#include <stdio.h>

int main(void) {
    // initialize data of matrices to perform matrix multiplication
    const int rows_A = 4, cols_A = 2;
    float matrix_A[rows_A * cols_A] = {
        2, 8,
        5, 1,
        4, 2,
        8, 6
    };
    const int rows_B = 3, cols_B = 2;
    float matrix_B[rows_B * cols_B] = {
        10, 5,
        9, 9,
        5, 4
    };

    // 1. Allocate `ggml_context` to store tensor data
    // Calculate the size needed to allocate
    size_t ctx_size = 0;
    ctx_size += rows_A * cols_A * ggml_type_size(GGML_TYPE_F32); // tensor a
    ctx_size += rows_B * cols_B * ggml_type_size(GGML_TYPE_F32); // tensor b
    ctx_size += rows_A * rows_B * ggml_type_size(GGML_TYPE_F32); // result
    ctx_size += 3 * ggml_tensor_overhead(); // metadata for 3 tensors
    ctx_size += ggml_graph_overhead(); // compute graph
    ctx_size += 1024; // some overhead (exact calculation omitted for simplicity)

    // Allocate `ggml_context` to store tensor data
    struct ggml_init_params params = {
        /*.mem_size =*/ ctx_size,
        /*.mem_buffer =*/ NULL,
        /*.no_alloc =*/ false,
    };
    struct ggml_context * ctx = ggml_init(params);

    // 2. Create tensors and set data
    struct ggml_tensor * tensor_a = ggml_new_tensor_2d(ctx, GGML_TYPE_F32, cols_A, rows_A);
    struct ggml_tensor * tensor_b = ggml_new_tensor_2d(ctx, GGML_TYPE_F32, cols_B, rows_B);
    memcpy(tensor_a->data, matrix_A, ggml_nbytes(tensor_a));
    memcpy(tensor_b->data, matrix_B, ggml_nbytes(tensor_b));


    // 3. Create a `ggml_cgraph` for mul_mat operation
    struct ggml_cgraph * gf = ggml_new_graph(ctx);

    // result = a*b^T
    // Pay attention: ggml_mul_mat(A, B) ==> B will be transposed internally
    // the result is transposed
    struct ggml_tensor * result = ggml_mul_mat(ctx, tensor_a, tensor_b);

    // Mark the "result" tensor to be computed
    ggml_build_forward_expand(gf, result);

    // 4. Run the computation
    int n_threads = 1; // Optional: number of threads to perform some operations with multi-threading
    ggml_graph_compute_with_ctx(ctx, gf, n_threads);

    // 5. Retrieve results (output tensors)
    float * result_data = (float *) result->data;
    printf("mul mat (%d x %d) (transposed result):\n[", (int) result->ne[0], (int) result->ne[1]);
    for (int j = 0; j < result->ne[1]/* rows */; j++) {
        if (j > 0) {
            printf("\n");
        }

        for (int i = 0; i < result->ne[0]/* cols */; i++) {
            printf(" %.2f", result_data[j * result->ne[0] + i]);
        }
    }
    printf(" ]\n");

    // 6. Free memory and exit
    ggml_free(ctx);
    return 0;
}
然后将以下代码写入 examples/demo/CMakeLists.txt :
set(TEST_TARGET demo)
add_executable(${TEST_TARGET} demo)
target_link_libraries(${TEST_TARGET} PRIVATE ggml)
编辑 examples/CMakeLists.txt ,在末尾加入这一行代码:
add_subdirectory(demo)
然后编译并运行:
cmake -B build
cmake --build build --config Release --target demo

# Run it
./build/bin/demo
期望的结果应该是这样:
mul mat (4 x 3) (transposed result):
[ 60.00 55.00 50.00 110.00
 90.00 54.00 54.00 126.00
 42.00 29.00 28.00 64.00 ]
“Backend” in ggml refers to an interface that can handle tensor operations. Backend can be CPU, CUDA, Vulkan, etc.
在 ggml 中,“后端”指的是一个可以处理张量操作的接口,比如 CPU、CUDA、Vulkan 等。
后端可以抽象化计算图的执行。当定义后,一个计算图就可以在相关硬件上用对应的后端实现去进行计算。注意,在这个过程中,ggml 会自动为需要的中间结果预留内存,并基于其生命周期优化内存使用。
使用后端进行计算或推理,基本步骤如下:
ggml_backendggml_context 以保存张量的 metadata (此时还不需要直接分配张量的数据)ggml_backend_buffer 用来存储所有的张量ggml_cgraphggml_gallocr 用以分配计算图ggml_backend_sched 调度计算图本示例的代码基于 simple-backend.cpp:
#include "ggml.h"
#include "ggml-alloc.h"
#include "ggml-backend.h"
#ifdef GGML_USE_CUDA
#include "ggml-cuda.h"
#endif

#include <stdlib.h>
#include <string.h>
#include <stdio.h>

int main(void) {
    // initialize data of matrices to perform matrix multiplication
    const int rows_A = 4, cols_A = 2;
    float matrix_A[rows_A * cols_A] = {
        2, 8,
        5, 1,
        4, 2,
        8, 6
    };
    const int rows_B = 3, cols_B = 2;
    float matrix_B[rows_B * cols_B] = {
        10, 5,
        9, 9,
        5, 4
    };

    // 1. Initialize backend
    ggml_backend_t backend = NULL;
#ifdef GGML_USE_CUDA
    fprintf(stderr, "%s: using CUDA backend\n", __func__);
    backend = ggml_backend_cuda_init(0); // init device 0
    if (!backend) {
        fprintf(stderr, "%s: ggml_backend_cuda_init() failed\n", __func__);
    }
#endif
    // if there aren't GPU Backends fallback to CPU backend
    if (!backend) {
        backend = ggml_backend_cpu_init();
    }

    // Calculate the size needed to allocate
    size_t ctx_size = 0;
    ctx_size += 2 * ggml_tensor_overhead(); // tensors
    // no need to allocate anything else!

    // 2. Allocate `ggml_context` to store tensor data
    struct ggml_init_params params = {
        /*.mem_size =*/ ctx_size,
        /*.mem_buffer =*/ NULL,
        /*.no_alloc =*/ true, // the tensors will be allocated later by ggml_backend_alloc_ctx_tensors()
    };
    struct ggml_context * ctx = ggml_init(params);

    // Create tensors metadata (only there shapes and data type)
    struct ggml_tensor * tensor_a = ggml_new_tensor_2d(ctx, GGML_TYPE_F32, cols_A, rows_A);
    struct ggml_tensor * tensor_b = ggml_new_tensor_2d(ctx, GGML_TYPE_F32, cols_B, rows_B);

    // 4. Allocate a `ggml_backend_buffer` to store all tensors
    ggml_backend_buffer_t buffer = ggml_backend_alloc_ctx_tensors(ctx, backend);

    // 5. Copy tensor data from main memory (RAM) to backend buffer
    ggml_backend_tensor_set(tensor_a, matrix_A, 0, ggml_nbytes(tensor_a));
    ggml_backend_tensor_set(tensor_b, matrix_B, 0, ggml_nbytes(tensor_b));

    // 6. Create a `ggml_cgraph` for mul_mat operation
    struct ggml_cgraph * gf = NULL;
    struct ggml_context * ctx_cgraph = NULL;
    {
        // create a temporally context to build the graph
        struct ggml_init_params params0 = {
            /*.mem_size =*/ ggml_tensor_overhead()*GGML_DEFAULT_GRAPH_SIZE + ggml_graph_overhead(),
            /*.mem_buffer =*/ NULL,
            /*.no_alloc =*/ true, // the tensors will be allocated later by ggml_gallocr_alloc_graph()
        };
        ctx_cgraph = ggml_init(params0);
        gf = ggml_new_graph(ctx_cgraph);

        // result = a*b^T
        // Pay attention: ggml_mul_mat(A, B) ==> B will be transposed internally
        // the result is transposed
        struct ggml_tensor * result0 = ggml_mul_mat(ctx_cgraph, tensor_a, tensor_b);

        // Add "result" tensor and all of its dependencies to the cgraph
        ggml_build_forward_expand(gf, result0);
    }

    // 7. Create a `ggml_gallocr` for cgraph computation
    ggml_gallocr_t allocr = ggml_gallocr_new(ggml_backend_get_default_buffer_type(backend));
    ggml_gallocr_alloc_graph(allocr, gf);

    // (we skip step 8. Optionally: schedule the cgraph using `ggml_backend_sched`)

    // 9. Run the computation
    int n_threads = 1; // Optional: number of threads to perform some operations with multi-threading
    if (ggml_backend_is_cpu(backend)) {
        ggml_backend_cpu_set_n_threads(backend, n_threads);
    }
    ggml_backend_graph_compute(backend, gf);

    // 10. Retrieve results (output tensors)
    // in this example, output tensor is always the last tensor in the graph
    struct ggml_tensor * result = gf->nodes[gf->n_nodes - 1];
    float * result_data = malloc(ggml_nbytes(result));
    // because the tensor data is stored in device buffer, we need to copy it back to RAM
    ggml_backend_tensor_get(result, result_data, 0, ggml_nbytes(result));
    printf("mul mat (%d x %d) (transposed result):\n[", (int) result->ne[0], (int) result->ne[1]);
    for (int j = 0; j < result->ne[1]/* rows */; j++) {
        if (j > 0) {
            printf("\n");
        }

        for (int i = 0; i < result->ne[0]/* cols */; i++) {
            printf(" %.2f", result_data[j * result->ne[0] + i]);
        }
    }
    printf(" ]\n");
    free(result_data);

    // 11. Free memory and exit
    ggml_free(ctx_cgraph);
    ggml_gallocr_free(allocr);
    ggml_free(ctx);
    ggml_backend_buffer_free(buffer);
    ggml_backend_free(backend);
    return 0;
}
编译并运行:
cmake -B build
cmake --build build --config Release --target demo

# Run it
./build/bin/demo
期望结果应该和上面的例子相同:
mul mat (4 x 3) (transposed result):
[ 60.00 55.00 50.00 110.00
 90.00 54.00 54.00 126.00
 42.00 29.00 28.00 64.00 ]
ggml_cgraph 代表了计算图,它定义了后端执行计算的顺序。打印计算图是一个非常有用的 debug 工具,尤其是模型复杂时。
可以使用 ggml_graph_print 去打印计算图:
...

// Mark the "result" tensor to be computed
ggml_build_forward_expand(gf, result0);

// Print the cgraph
ggml_graph_print(gf);
运行程序:
=== GRAPH ===
n_nodes = 1
 - 0: [     4, 3, 1] MUL_MAT
n_leafs = 2
 - 0: [     2, 4] NONE leaf_0
 - 1: [     2, 3] NONE leaf_1
========================================
此外,你还可以把计算图打印成 graphviz 的 dot 文件格式:
ggml_graph_dump_dot(gf, NULL, "debug.dot");
然后使用 dot 命令或使用这个 网站 把 debug.dot 文件渲染成图片:
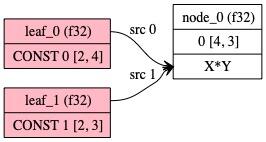
本文介绍了 ggml,涵盖基本概念、简单示例、后端示例。除了这些基础知识,ggml 还有很多有待我们学习。
接下来我们还会推出多篇文章,涵盖更多 ggml 的内容,包括 GGUF 格式模型、模型量化,以及多个后端如何协调配合。此外,你还可以参考 ggml 示例文件夹 学习更多高级用法和示例程序。请持续关注我们 ggml 的相关内容。
英文原文: https://hf.co/blog/introduction-to-ggml
原文作者: Xuan Son NGUYEN, Georgi Gerganov, slaren
译者: hugging-hoi2022
 官方公众号
官方公众号