ETJava Beta | Java
 注册
登录
注册
登录
注册
登录
注册
登录
上一篇我们分析了 Workflow、WorkflowTemplate、template 之间的关系。本篇主要分析如何在 argo-workflow 中使用 S3 存储 artifact 实现步骤之间的文件共享。
本文主要解决两个问题:
ArgoWorkflow 对接 S3 实现持久化,依赖于 artifact-repository 配置。
有三种方式设置相关配置:
注意:不管什么方式指定 artifact-repository,其中存储 S3 AKSK 信息的 Secret 都必须同步到 Workflow 所在的命名空间才行。
优先级 InWorkflowConfig > Namespace > Global
以 helm 方式部署的 ArgoWorkflow 的话默认就会以这种形式指定配置。
workflow-controller 的 deployment yaml 如下:
apiVersion: apps/v1
kind: Deployment
metadata:
  name: argo-workflow-argo-workflows-workflow-controller
  namespace: argo-dev
spec:
  template:
    metadata:
    spec:
      containers:
      - args:
        - --configmap
        - argo-workflow-argo-workflows-workflow-controller-configmap
        - --executor-image
        - quay.io/argoproj/argoexec:v3.4.11
        - --loglevel
        - info
        - --gloglevel
        - "0"
        - --log-format
        - text
可以看到在启动命令中以 --configmap argo-workflow-argo-workflows-workflow-controller-configmap 方式指定了配置文件来源的 Configmap。
这个 Configmap 的内容如下:
apiVersion: v1
data:
  # ... 省略
  artifactRepository: |
    s3:
      endpoint: minio.default.svc:9000
      bucket: argo
      insecure: true
      accessKeySecret:
        name: my-s3-secret
        key: accessKey
      secretKeySecret:
        name: my-s3-secret
        key: secretKey
kind: ConfigMap
metadata:
  name: argo-workflows-workflow-controller-configmap
  namespace: argo
包括了 S3 的 endpoint、bucket、aksk 等信息,借助这些信息 Workflow 就可以访问 S3 了。
根据当前实现,ArgoWorkflow 会优先使用 Workflow 所在命名空间下的默认 artifactRepository 配置。
默认会使用名为 artifact-repositories 的 Configmap 作为当前命名空间下 Workflow 的 artifactRepository 配置,Configmap 中的内容大概长这样:
注意:Configmap 名必须是 artifact-repositories
apiVersion: v1
kind: ConfigMap
metadata:
  # If you want to use this config map by default, name it "artifact-repositories". Otherwise, you can provide a reference to a
  # different config map in `artifactRepositoryRef.configMap`.
  name: artifact-repositories
  annotations:
    # v3.0 and after - if you want to use a specific key, put that key into this annotation.
    workflows.argoproj.io/default-artifact-repository: my-artifact-repository
data:
  my-artifact-repository: |
    s3:
      bucket: lixd-argo
      endpoint: minio.argo-dev.svc:9000
      insecure: true
      accessKeySecret:
        name: my-s3-secret
        key: accessKey
      secretKeySecret:
        name: my-s3-secret
        key: secretKey
 # 可以写多个 Repository
 my-artifact-repository2: ...
Data 中的每一个 Key 对应一个 Repository, 然后使用 workflows.argoproj.io/default-artifact-repository annotation 来指定默认使用哪个 artifactRepository。
比如这里就指定了 my-artifact-repository 为默认 artifactRepository.
除此之外,还可以直接在 Workflow 中指定具体要使用哪个 artifactRepository。
spec:
  artifactRepositoryRef:
    configMap: my-artifact-repository # default is "artifact-repositories"
    key: v2-s3-artifact-repository # default can be set by the `workflows.argoproj.io/default-artifact-repository` annotation in config map.
需要指定 Configmap 以及具体的 Key 来找到唯一的 artifactRepository。
只会在当前命名空间下找,因此需要确保这个 Configmap 存在。
或者直接把 S3 配置写到 Workflow 里(不推荐),就像这样:
  templates:
  - name: artifact-example
    inputs:
      artifacts:
      - name: my-input-artifact
        path: /my-input-artifact
        s3:
          endpoint: s3.amazonaws.com
          bucket: my-aws-bucket-name
          key: path/in/bucket/my-input-artifact.tgz
          accessKeySecret:
            name: my-aws-s3-credentials
            key: accessKey
          secretKeySecret:
            name: my-aws-s3-credentials
            key: secretKey
    outputs:
      artifacts:
      - name: my-output-artifact
        path: /my-output-artifact
        s3:
          endpoint: storage.googleapis.com
          bucket: my-gcs-bucket-name
          # NOTE that, by default, all output artifacts are automatically tarred and
          # gzipped before saving. So as a best practice, .tgz or .tar.gz
          # should be incorporated into the key name so the resulting file
          # has an accurate file extension.
          key: path/in/bucket/my-output-artifact.tgz
          accessKeySecret:
            name: my-gcs-s3-credentials
            key: accessKey
          secretKeySecret:
            name: my-gcs-s3-credentials
            key: secretKey
          region: my-GCS-storage-bucket-region
    container:
      image: debian:latest
      command: [sh, -c]
      args: ["cp -r /my-input-artifact /my-output-artifact"]
只会在当前命名空间下找,因此需要确保这个 Configmap 存在。
包括三种方式:
注意:由于 S3 AKSK 以 Secret 方式存储,因此三种配置方式都需要将该 Secret 同步到 Workflow 所在命名空间,否则无法在 Pod 中使用,导致 Workflow 无法正常运行。
如果 ArgoWorkflow 能自动接管就好了,可以使用 https://github.com/mittwald/kubernetes-replicator 来自动同步
三种方式的区别:
使用场景:
如果全局只有一个 S3 配置,那就使用 全局配置方式,最简单。
如果租户间使用命名空间隔离,使用不同 S3,那使用命名空间默认配置方式就刚好
以上都不满足的时候,才建议使用 Workflow 中指定配置方式。
当 Workflow 中不显式指定 S3 配置信息时,argo 会按照前面的优先级自动寻找 artifact-repository 配置。
优先使用 Namespace 下的配置,没有则使用全局配置
一个完整的 Demo 如下:
apiVersion: argoproj.io/v1alpha1
kind: Workflow
metadata:
  generateName: artifact-passing-
spec:
  entrypoint: artifact-example
  templates:
  - name: artifact-example
    steps:
    - - name: generate-artifact
        template: whalesay
    - - name: consume-artifact
        template: print-message
        arguments:
          artifacts:
          # bind message to the hello-art artifact
          # generated by the generate-artifact step
          - name: message
            from: "{{steps.generate-artifact.outputs.artifacts.hello-art}}"

  - name: whalesay
    container:
      image: docker/whalesay:latest
      command: [sh, -c]
      args: ["cowsay hello world | tee /tmp/hello_world.txt"]
    outputs:
      artifacts:
      # generate hello-art artifact from /tmp/hello_world.txt
      # artifacts can be directories as well as files
      - name: hello-art
        path: /tmp/hello_world.txt

  - name: print-message
    inputs:
      artifacts:
      # unpack the message input artifact
      # and put it at /tmp/message
      - name: message
        path: /tmp/message
    container:
      image: alpine:latest
      command: [sh, -c]
      args: ["cat /tmp/message"]
第一个步骤,通过
第一个步骤,通过 tee 命令创建了一个文件并通过 outputs 进行输出,由于指定的是 artifacts,因此这个文件会被存储到 S3。
然后第二个步骤指定 inputs.artifacts 从 S3 读取名为 message 的 artifact 并存储到 /tmp/message 目录。
问题来了第二步中读取的 artifact 是从哪儿来的呢,就是 steps 中通过 arguments.artifacts 指定的,通过 name 进行关联。
整个逻辑和 parameter 基本一致
1)whalesay template 通过 outputs.artifacts 来申明当前 template 会输出一个 artifact。
2)print-message 中通过 inputs.artifacts 申明需要一个 artifact,并指定存储位置
3)steps 在使用该 template 时,通过 arguments.artifacts 来指定一个 artifact,这个 artifact 来源就是 1 中的 output,通过{{steps.generate-artifact.outputs.artifacts.$name}} 语法引用。
	artifact-passing-vzp2r-1469537892:
      boundaryID: artifact-passing-vzp2r
      displayName: generate-artifact
      finishedAt: "2024-03-29T08:42:34Z"
      hostNodeName: lixd-argo
      id: artifact-passing-vzp2r-1469537892
      message: 'Error (exit code 1): You need to configure artifact storage. More
        information on how to do this can be found in the docs: https://argo-workflows.readthedocs.io/en/release-3.5/configure-artifact-repository/'
      name: artifact-passing-vzp2r[0].generate-artifact
默认情况下,所有的 artifact 会被打成 tar 包并 gzip 压缩,可以通过archive 字段来配置压缩情况:
<... snipped ...>
    outputs:
      artifacts:
        # default behavior - tar+gzip default compression.
      - name: hello-art-1
        path: /tmp/hello_world.txt

        # disable archiving entirely - upload the file / directory as is.
        # this is useful when the container layout matches the desired target repository layout.
      - name: hello-art-2
        path: /tmp/hello_world.txt
        archive:
          none: {}

        # customize the compression behavior (disabling it here).
        # this is useful for files with varying compression benefits,
        # e.g. disabling compression for a cached build workspace and large binaries,
        # or increasing compression for "perfect" textual data - like a json/xml export of a large database.
      - name: hello-art-3
        path: /tmp/hello_world.txt
        archive:
          tar:
            # no compression (also accepts the standard gzip 1 to 9 values)
            compressionLevel: 0
<... snipped ...>
所有 Artifact 都会上传到 S3,为了保证 S3 不被填满,垃圾清理是个问题。
好消息是,argo-workflow 3.4 开始,可以在 Workflow 中添加配置来实现自动删除不需要的 Artifacts。
当前提供两种回收策略,分别是:
OnWorkflowCompletion:工作流运行完成后就删除OnWorkflowDeletion:工作流被删除时才删除同时可以统一为 Workflow 中的所有 artifact 配置回收策略,也可以单独为每一个 artifact 配置回收策略。
Demo 如下:
apiVersion: argoproj.io/v1alpha1
kind: Workflow
metadata:
  generateName: artifact-gc-
spec:
  entrypoint: main
  artifactGC:
    strategy: OnWorkflowDeletion  # default Strategy set here applies to all Artifacts by default
  templates:
    - name: main
      container:
        image: argoproj/argosay:v2
        command:
          - sh
          - -c
        args:
          - |
            echo "can throw this away" > /tmp/temporary-artifact.txt
            echo "keep this" > /tmp/keep-this.txt
      outputs:
        artifacts:
          - name: temporary-artifact
            path: /tmp/temporary-artifact.txt
            s3:
              key: temporary-artifact.txt
          - name: keep-this
            path: /tmp/keep-this.txt
            s3:
              key: keep-this.txt
            artifactGC:
              strategy: Never   # optional override for an Artifact
核心部分如下:
spec:
  entrypoint: main
  # 为 Workflow 中的所有 artifact 统一配置
  artifactGC:
    strategy: OnWorkflowDeletion  # default Strategy set here applies to all Artifacts by default
# 单独指定 artifact 的回收策略
			outputs:
        artifacts:
          - name: temporary-artifact
            artifactGC:
              strategy: Never   # optional override for an Artifact
注意事项:为了避免相同工作流并发运行时,artifact 被误删除的问题,可以为不同工作流配置不同的 artifact repository。
argo-workflow 会启动一个 <wfName>-artgc-* 格式命名的 Pod 来执行垃圾回收工作,如果执行失败,整个 Workflow 也会被标记为失败。
同时由于finalizers 没有被删除掉
apiVersion: argoproj.io/v1alpha1
kind: Workflow
  finalizers:
  - workflows.argoproj.io/artifact-gc
会导致这个 Workflow 无法删除,可以执行以下命令移除
kubectl patch workflow my-wf \
    --type json \
    --patch='[ { "op": "remove", "path": "/metadata/finalizers" } ]'
为了优化体验,argo-workflow 3.5 版本新增了 forceFinalizerRemoval 参数
spec:
  artifactGC:
    strategy: OnWorkflowDeletion
    forceFinalizerRemoval: true
只要forceFinalizerRemoval 设置为 true,即时 GC 失败也会移除 finalizers。
除了 S3 Artifacts 之外,为了便于使用, argo-workflow 还内置了 git、http 方式来获取 artifact。
可以直接从指定 git 仓库 clone 代码,或者从指定 url 下载文件,就像这样:
apiVersion: argoproj.io/v1alpha1
kind: Workflow
metadata:
  generateName: hardwired-artifact-
spec:
  entrypoint: hardwired-artifact
  templates:
  - name: hardwired-artifact
    inputs:
      artifacts:
      # Check out the main branch of the argo repo and place it at /src
      # revision can be anything that git checkout accepts: branch, commit, tag, etc.
      - name: argo-source
        path: /src
        git:
          repo: https://github.com/argoproj/argo-workflows.git
          revision: "main"
      # Download kubectl 1.8.0 and place it at /bin/kubectl
      - name: kubectl
        path: /bin/kubectl
        mode: 0755
        http:
          url: https://storage.googleapis.com/kubernetes-release/release/v1.8.0/bin/linux/amd64/kubectl
      # Copy an s3 compatible artifact repository bucket (such as AWS, GCS and MinIO) and place it at /s3
      - name: objects
        path: /s3
        s3:
          endpoint: storage.googleapis.com
          bucket: my-bucket-name
          key: path/in/bucket
          accessKeySecret:
            name: my-s3-credentials
            key: accessKey
          secretKeySecret:
            name: my-s3-credentials
            key: secretKey
    container:
      image: debian
      command: [sh, -c]
      args: ["ls -l /src /bin/kubectl /s3"]
测试点:
Configmap:
部署一个 local-path-storage csi,如果有别的 csi 也可以跳过这一步
kubectl apply -f https://raw.githubusercontent.com/rancher/local-path-provisioner/v0.0.24/deploy/local-path-storage.yaml
然后部署 minio
helm install minio oci://registry-1.docker.io/bitnamicharts/minio
    my-release-minio.default.svc.cluster.local

   export ROOT_USER=$(kubectl get secret --namespace default my-release-minio -o jsonpath="{.data.root-user}" | base64 -d)
   export ROOT_PASSWORD=$(kubectl get secret --namespace default my-release-minio -o jsonpath="{.data.root-password}" | base64 -d)
cm.yaml 完整内容如下:
apiVersion: v1
kind: ConfigMap
metadata:
  name: artifact-repositories
  annotations:
    workflows.argoproj.io/default-artifact-repository: my-artifact-repository
data:
  my-artifact-repository: |
    s3:
      bucket: argo
      endpoint: minio.default.svc.cluster.local:9000
      insecure: true
      accessKeySecret:
        name: my-s3-secret
        key: accessKey
      secretKeySecret:
        name: my-s3-secret
        key: secretKey
secret.yaml 完整内容如下:
apiVersion: v1
stringData:
  accessKey: admin
  secretKey: minioadmin
kind: Secret
metadata:
  name: my-s3-secret
type: Opaque
创建 artifact repository 配置
kubectl apply -f cm.yaml
kubectl apply -f secret.yaml
两个步骤:
workflow.yaml 完整内容如下:
apiVersion: argoproj.io/v1alpha1
kind: Workflow
metadata:
  generateName: key-only-artifacts-
spec:
  entrypoint: main
  templates:
    - name: main
      dag:
        tasks:
          - name: generate
            template: generate
          - name: consume
            template: consume
            dependencies:
              - generate
    - name: generate
      container:
        image: argoproj/argosay:v2
        args: [ echo, hello, /mnt/file ]
      outputs:
        artifacts:
          - name: file
            path: /mnt/file
            s3:
              key: my-file
    - name: consume
      container:
        image: argoproj/argosay:v2
        args: [cat, /tmp/file]
      inputs:
        artifacts:
          - name: file
            path: /tmp/file
            s3:
              key: my-file
创建 Workflow
kubectl create -f workflow.yaml
等待运行完成
[root@lixd-argo artiface]# kubectl get wf
NAME                                  STATUS      AGE     MESSAGE
key-only-artifacts-9r84h              Succeeded   2m30s
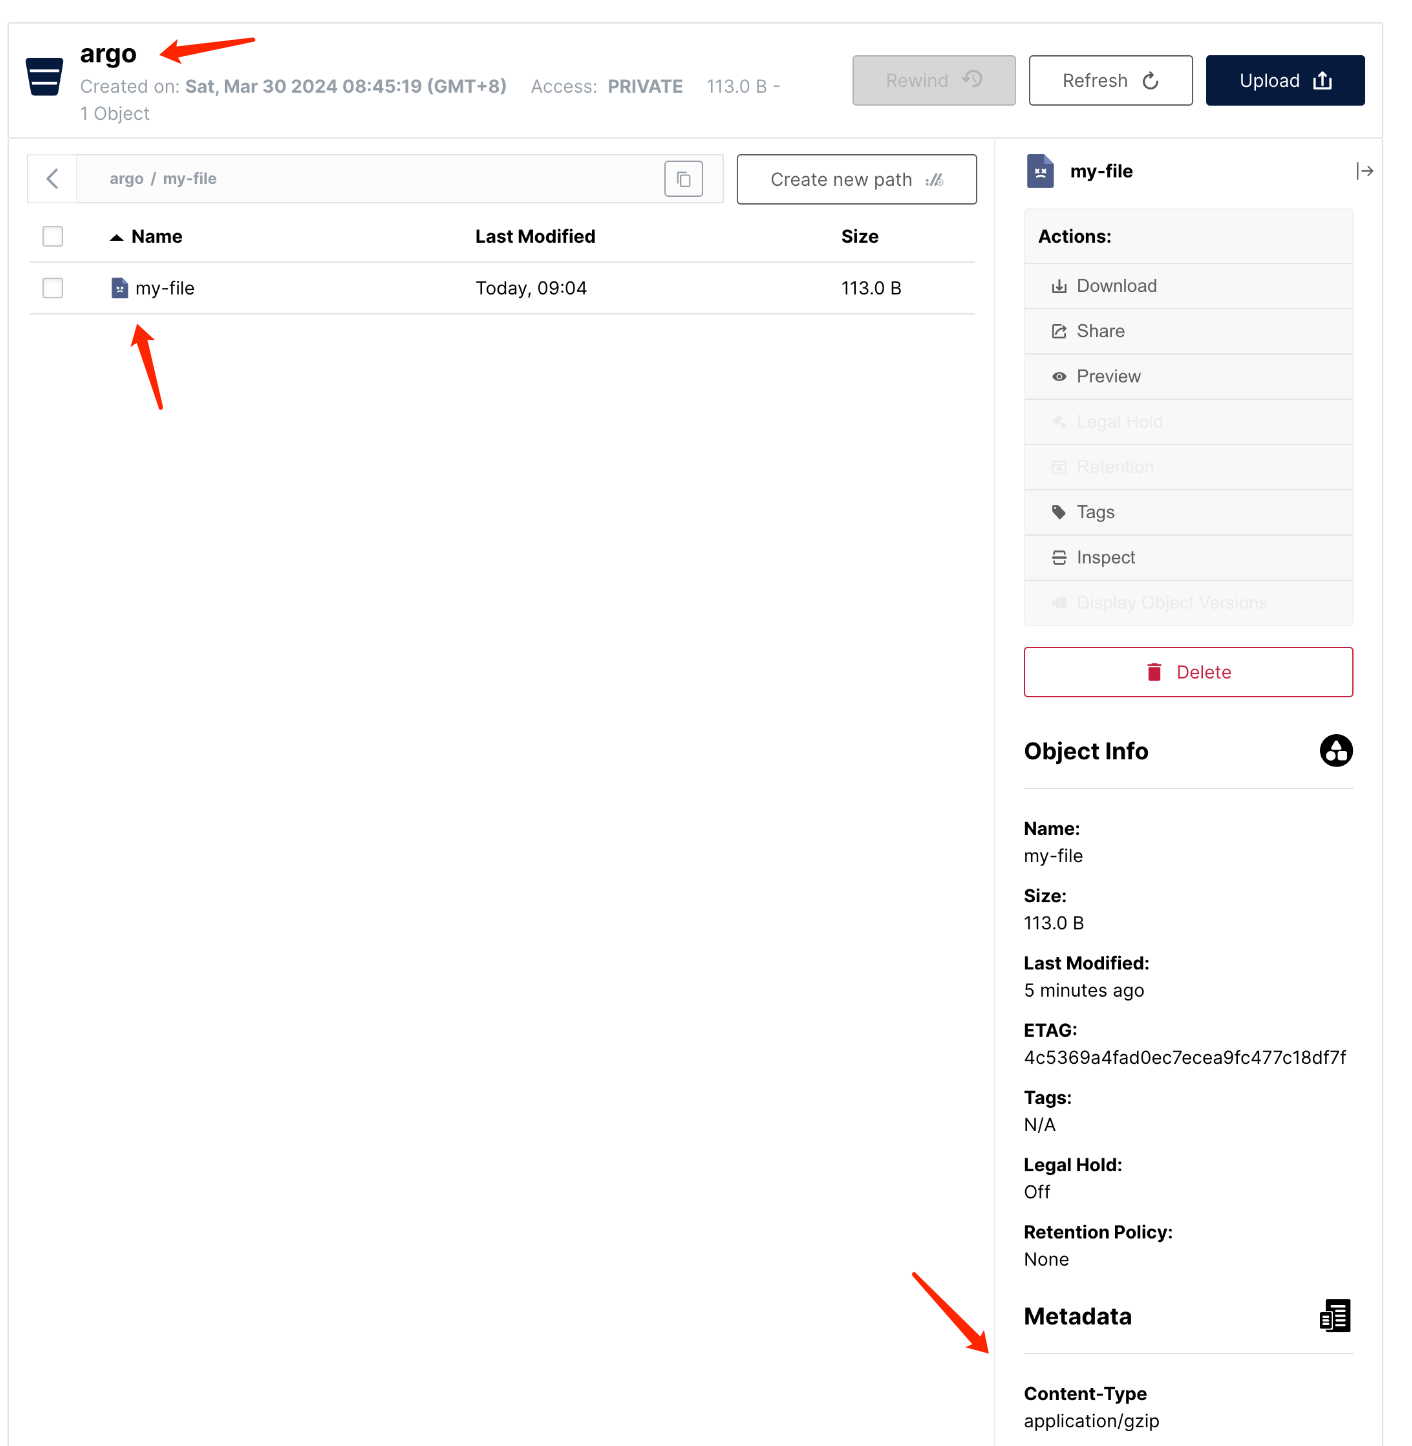
到 S3 中查看文件是否存在
可以看到,在 argo bucket 下有一个名为 my-file的文件存在,而且 context-type 是 application/gzip,这也验证了 argo 会对 artifact 执行 tar+gzip。
【ArgoWorkflow 系列】持续更新中,搜索公众号【探索云原生】订阅,阅读更多文章。

本文主要分析了 argo 中的 artifact 使用,包括如何配置 artifact-repository:
包括三种方式:
以及如何在 Workflow 中使用 artifact 并通过一个 Demo 进行演示。
 官方公众号
官方公众号